name: inverse layout: true class: center, middle, inverse <div class="my-header"><span> <a href="/training-material/topics/galaxy-interface" title="Return to topic page" ><i class="fa fa-level-up" aria-hidden="true"></i></a> <a href="https://github.com/galaxyproject/training-material/edit/main/topics/galaxy-interface/tutorials/get-data/slides.html"><i class="fa fa-pencil" aria-hidden="true"></i></a> </span></div> <div class="my-footer"><span> <img src="/training-material/assets/images/GTN-60px.png" alt="Galaxy Training Network" style="height: 40px;"/> </span></div> --- <img src="/training-material/assets/images/GTNLogo1000.png" alt="Galaxy Training Network" class="cover-logo"/> <br/> <br/> # Getting data into Galaxy <br/> <br/> <div markdown="0"> <div class="contributors-line"> <ul class="text-list"> <li> <a href="/training-material/hall-of-fame/pajanne/" class="contributor-badge contributor-pajanne"><img src="https://avatars.githubusercontent.com/pajanne?s=36" alt="Anne Pajon avatar" width="36" class="avatar" /> Anne Pajon</a> <li> <a href="/training-material/hall-of-fame/tnabtaf/" class="contributor-badge contributor-tnabtaf"><img src="/training-material/assets/images/orcid.png" alt="orcid logo" width="36" height="36"/><img src="https://avatars.githubusercontent.com/tnabtaf?s=36" alt="Dave Clements avatar" width="36" class="avatar" /> Dave Clements</a> <li> <a href="/training-material/hall-of-fame/mblue9/" class="contributor-badge contributor-mblue9"><img src="/training-material/assets/images/orcid.png" alt="orcid logo" width="36" height="36"/><img src="https://avatars.githubusercontent.com/mblue9?s=36" alt="Maria Doyle avatar" width="36" class="avatar" /> Maria Doyle</a> <li> <a href="/training-material/hall-of-fame/shiltemann/" class="contributor-badge contributor-shiltemann"><img src="/training-material/assets/images/orcid.png" alt="orcid logo" width="36" height="36"/><img src="https://avatars.githubusercontent.com/shiltemann?s=36" alt="Saskia Hiltemann avatar" width="36" class="avatar" /> Saskia Hiltemann</a></li> </ul> </div> </div> <!-- modified date --> <div class="footnote" style="bottom: 8em;"> <i class="far fa-calendar" aria-hidden="true"></i><span class="visually-hidden">last_modification</span> Updated: <i class="fas fa-fingerprint" aria-hidden="true"></i><span class="visually-hidden">purl</span><abbr title="Persistent URL">PURL</abbr>: <a href="https://gxy.io/GTN:S00062">gxy.io/GTN:S00062</a> </div> <!-- other slide formats (video and plain-text) --> <div class="footnote" style="bottom: 5em;"> <i class="fas fa-file-alt" aria-hidden="true"></i><span class="visually-hidden">text-document</span><a href="slides-plain.html"> Plain-text slides</a> | </div> <!-- usage tips --> <div class="footnote" style="bottom: 2em;"> <strong>Tip: </strong>press <kbd>P</kbd> to view the presenter notes | <i class="fa fa-arrows" aria-hidden="true"></i><span class="visually-hidden">arrow-keys</span> Use arrow keys to move between slides </div> ??? Presenter notes contain extra information which might be useful if you intend to use these slides for teaching. Press `P` again to switch presenter notes off Press `C` to create a new window where the same presentation will be displayed. This window is linked to the main window. Changing slides on one will cause the slide to change on the other. Useful when presenting. --- ## Requirements Before diving into this slide deck, we recommend you to have a look at: - [Introduction to Galaxy Analyses](/training-material/topics/introduction) - Galaxy Basics for genomics: [<i class="fas fa-laptop" aria-hidden="true"></i><span class="visually-hidden">tutorial</span> hands-on](/training-material/topics/introduction/tutorials/galaxy-intro-101/tutorial.html) --- ### <i class="far fa-question-circle" aria-hidden="true"></i><span class="visually-hidden">question</span> Questions - How do I get my data into Galaxy? - How do I get public data into Galaxy? --- # Getting data into Galaxy ??? -> Pressing **P** will toggle presenter mode. --- ## Many ways to get data into your workspace 1. Import using **Get Data** sources e.g. UCSC, SRA 2. Import from a Galaxy **Data Library** 3. Import using **Upload File** - Import from your computer - Directly enter text - Import from a URL - Import using FTP - Import directly into Collection - Import using Rule Builder ??? - To do analysis in Galaxy you first need data to work on. - There are many ways and sources for getting data into your history. - This tutorial will cover all of the techniques listed here. --- ### Best method depends on where the data is, and how big it is  .footnote[[Source: Galaxy Community Hub](https://galaxyproject.org/tutorials/upload/)] --- # 1. The ***Get Data*** toolbox section --- - *Click* on the **Get Data** toolbox in the toolbox (the left panel)  --- .pull-right[.image-75[]] - Expands to show data sources - E.g. UCSC, NCBI, Uniprot, .. - The specific data sources available on your Galaxy instance are determine by the server's administrator - All of these data sources can bring datasets (files) into your Galaxy workspace (history) ??? This shows the list of data sources that were available on usegalaxy.org in mid 2017. --- Two large data sources you can access through Galaxy are UCSC and SRA .pull-right[] .pull-left[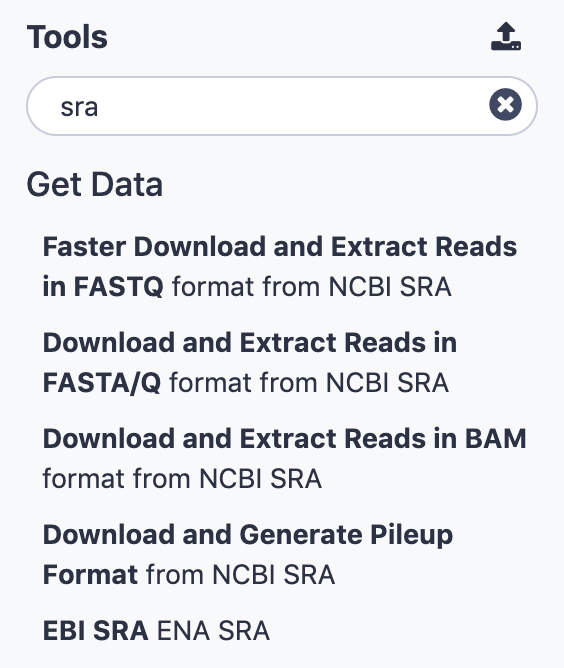] --- # 2. Import from Shared Data Library --- .pull-left[ - Top menu bar -> Shared Data -> Data Libraries - Configured by a Galaxy Administator - Can be imported directly into your history - Example: all GTN tutorial data] .pull-right[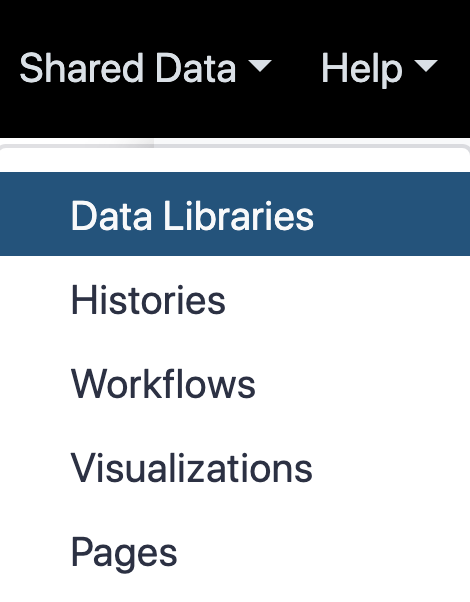] --- You can select the files you want and send to History as datasets or collection .image-75[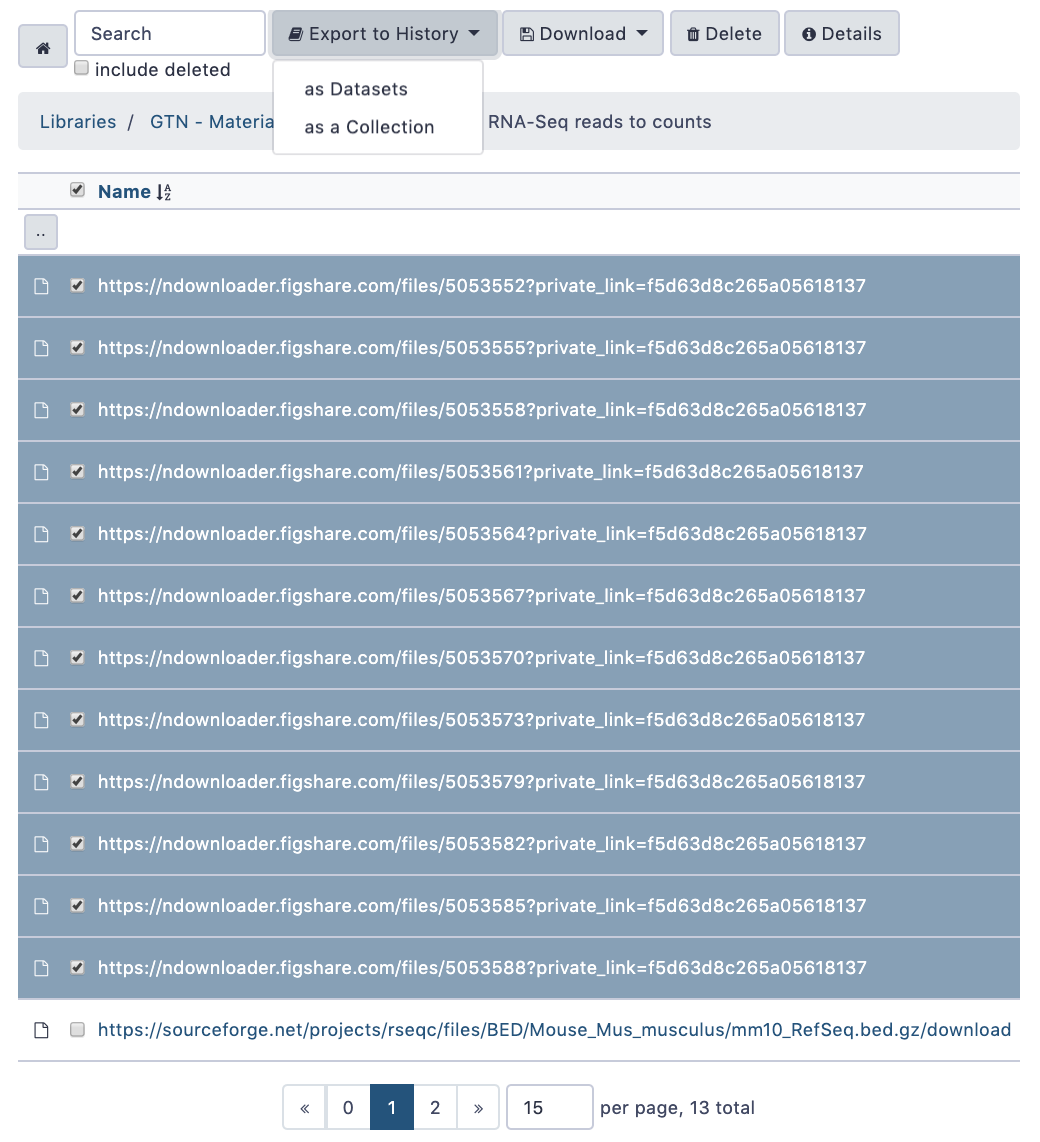] --- # 3. Upload from your computer --- .image-50[] 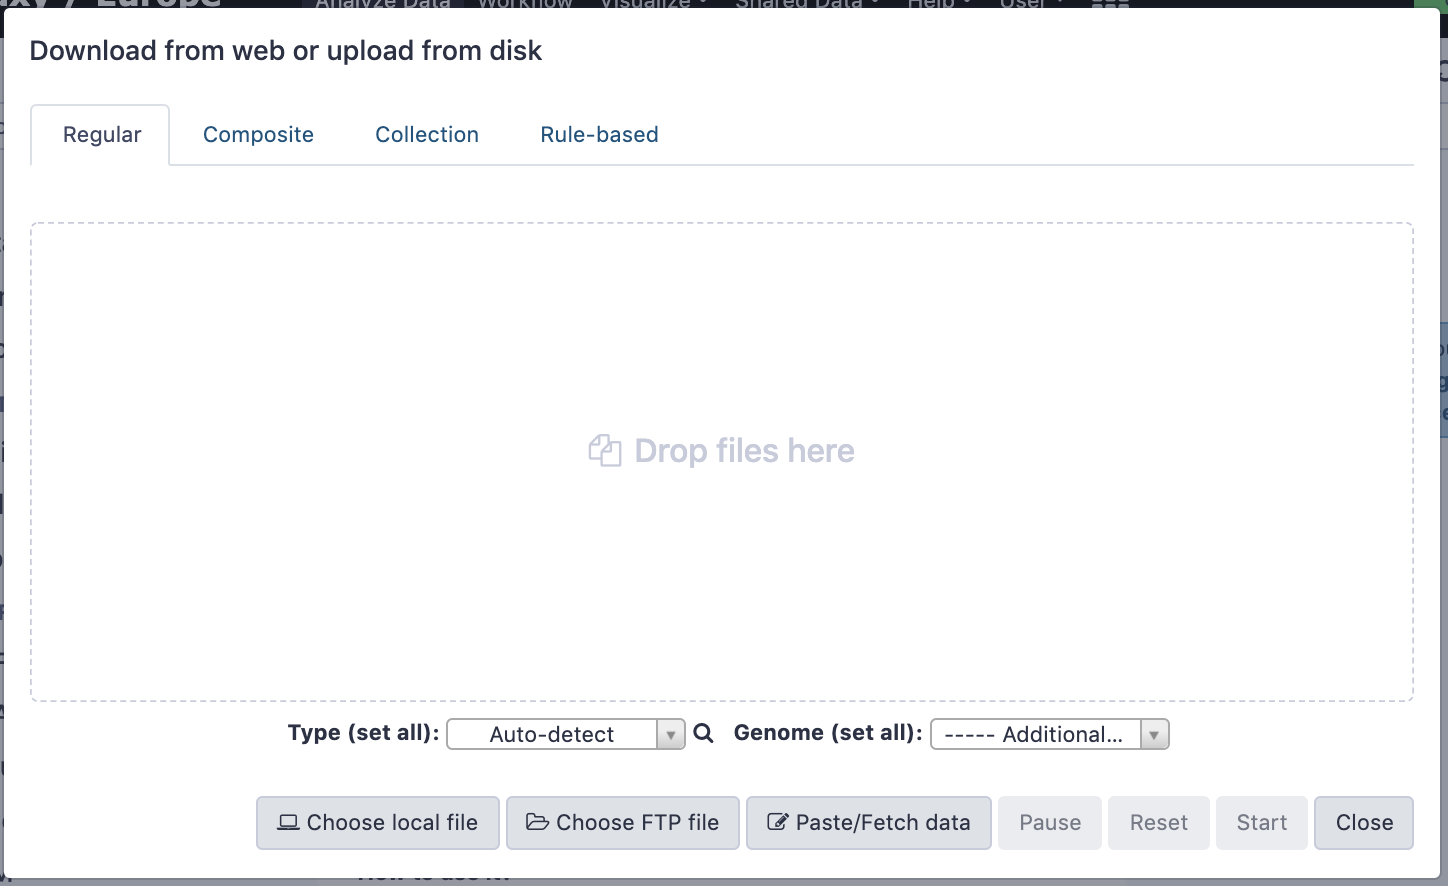 ??? - The **Upload File** data source can import data: - from your computer - by directly entering text - using a URL - and via FTP This is probably the most commonly used tool for bringing data into Galaxy, and it is installed on almost every Galaxy server. --- # Choose files 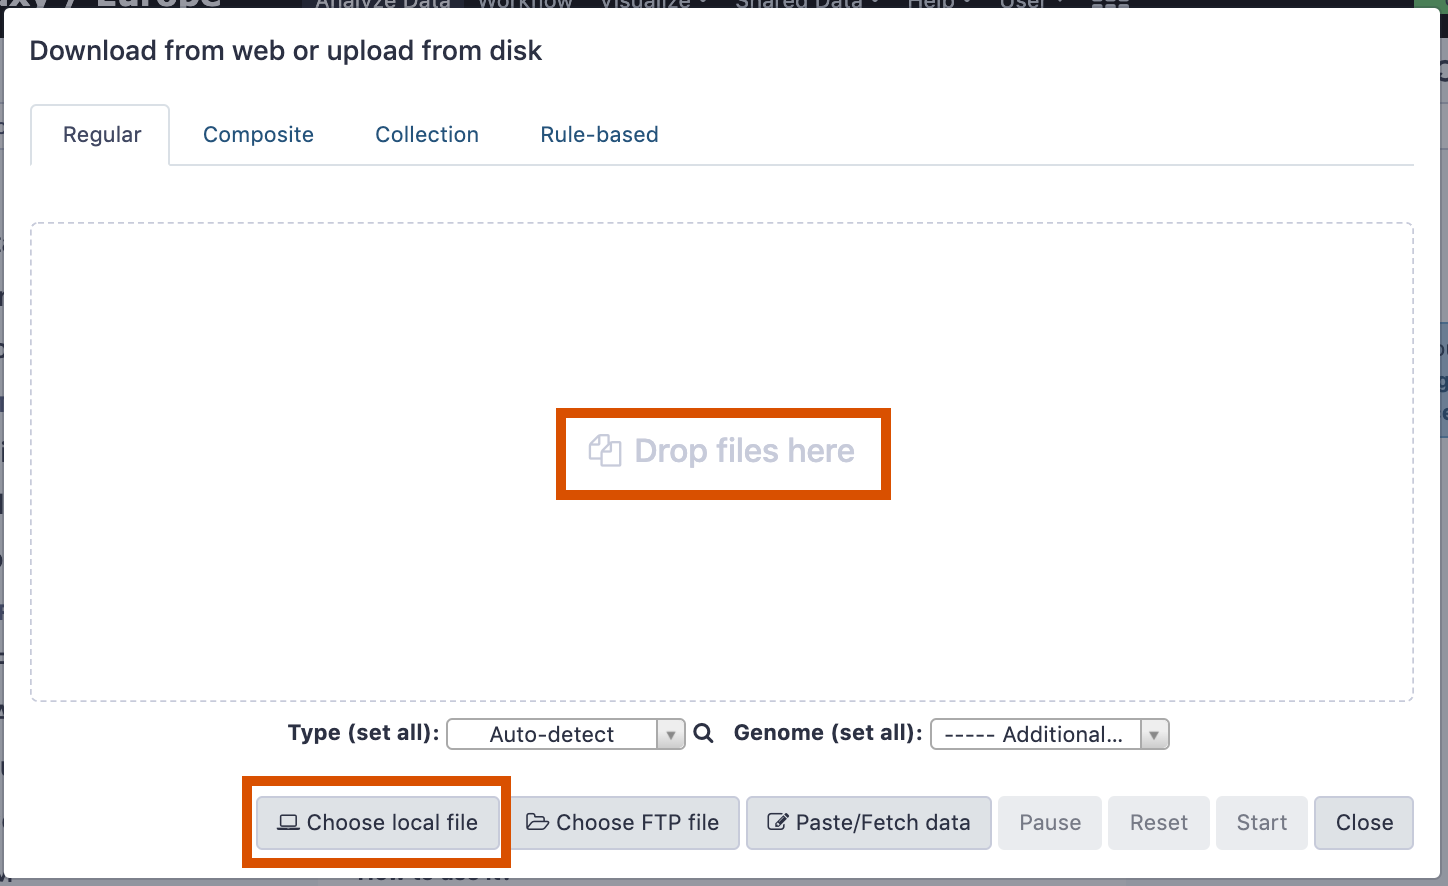 ??? - Drag and drop is supported - as is the standard file selection using your browser. --- # Set Metadata - **Datatype** (e.g. FastQ, VCF, BAM, tabular, ..) - Galaxy will autodetect by default (sometimes guesses wrong) - **Genome Build** (e.g. hg19, mm9, ..) - must be set manually (can be done later as well) 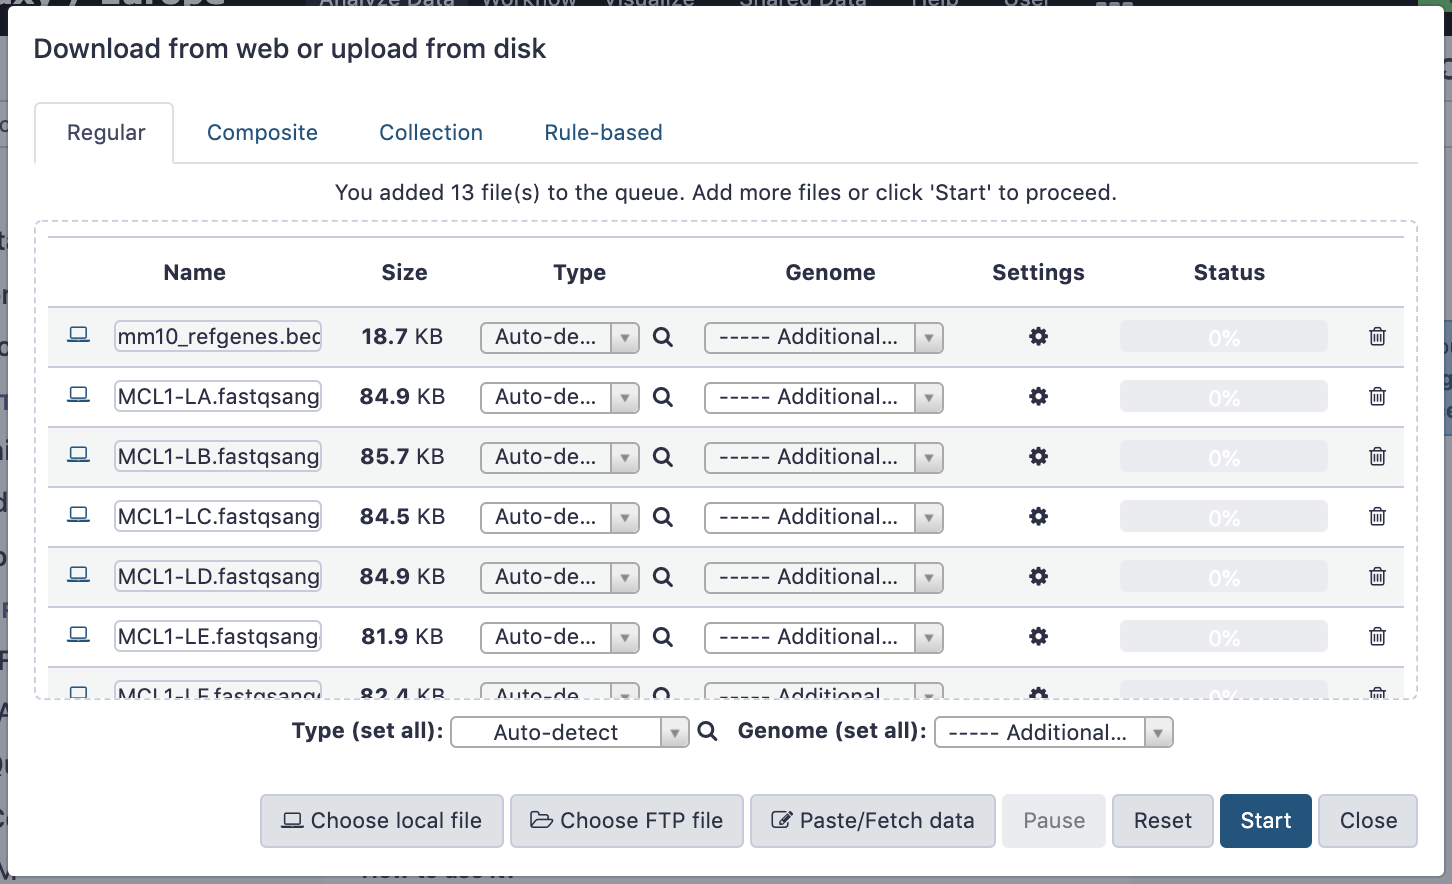 ??? - Here we have imported 13 files - one with genome annotation in GTF format - 12 paired end read files from an RNA-Seq experiment* - could import them now and have Galaxy guess at their file types. * From UC Davis Training Material. --- - Can be set for all files at once: 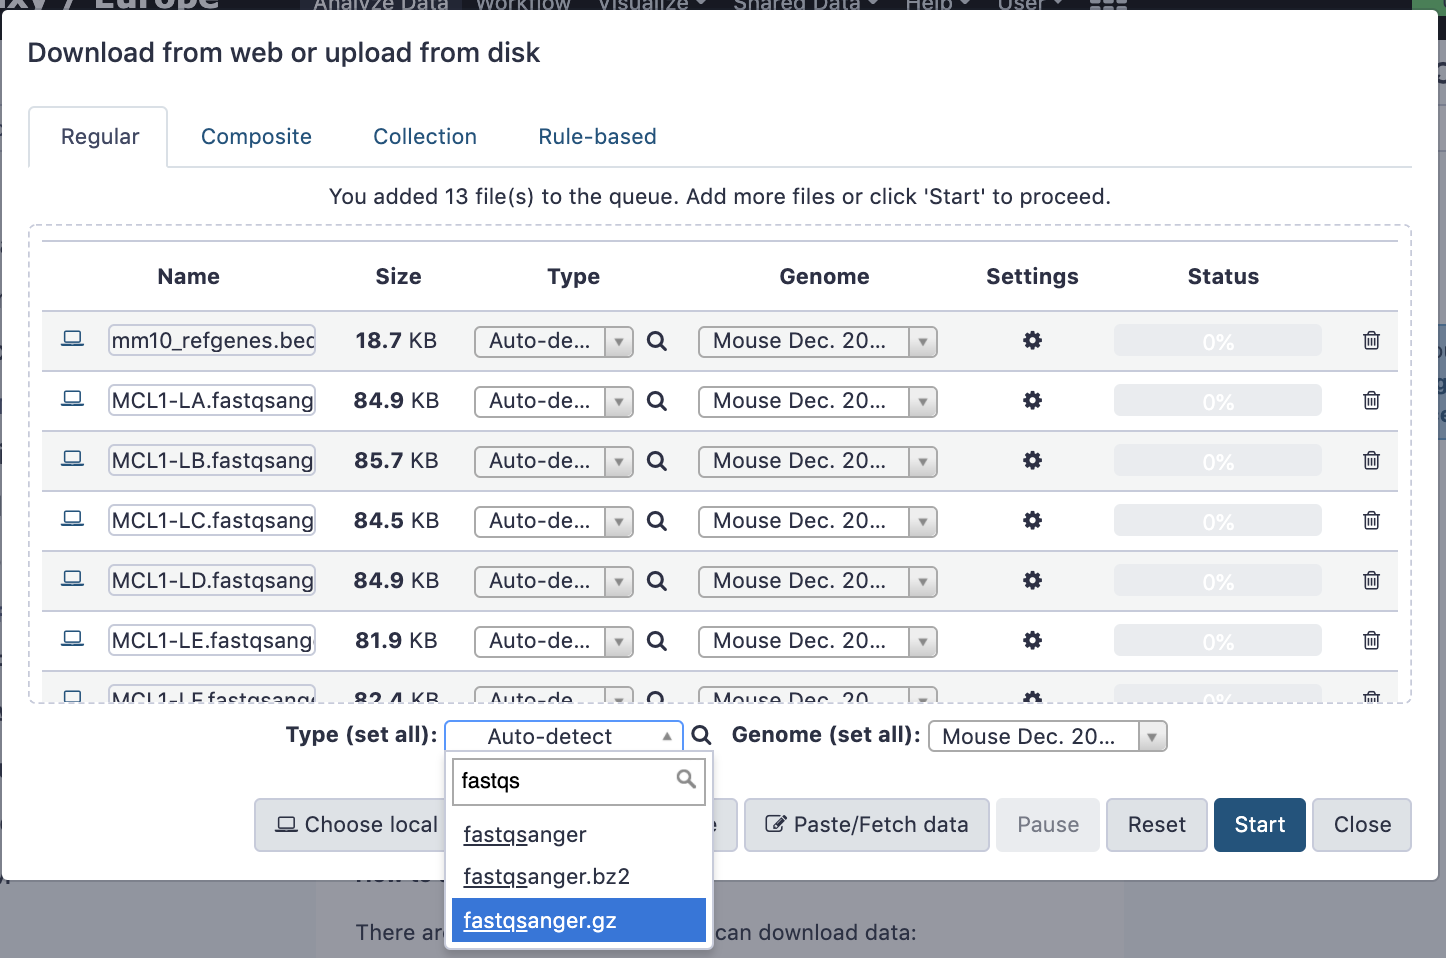 --- - Or per file:  ??? - Here we are manually setting the first dataset's datatype to GTF, a common genome annotation format. --- # Start upload process: - Once everything is ready, click the **Start** button 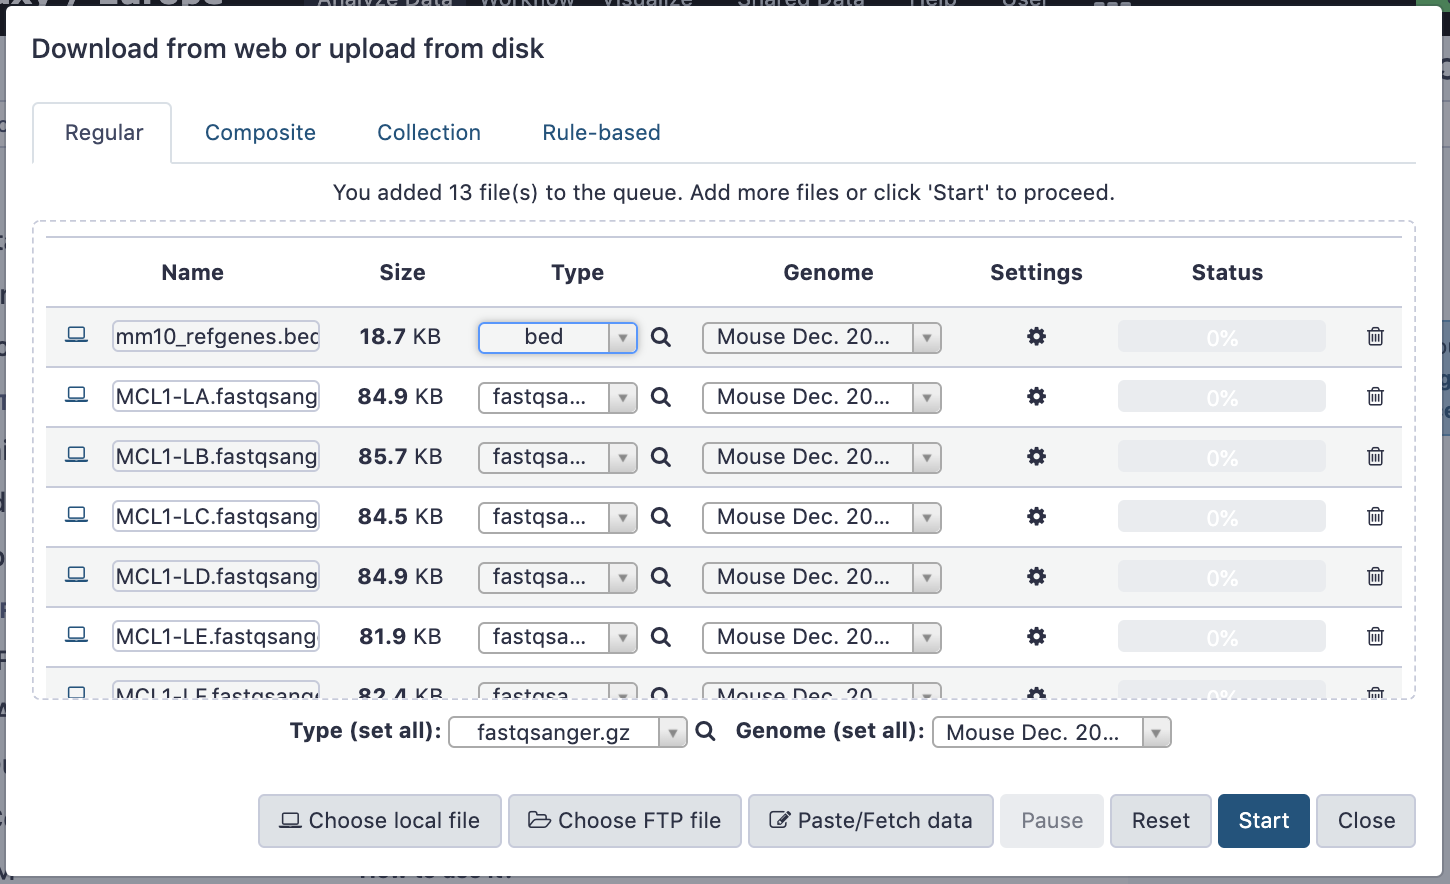 ??? - Data transfer does not start until you click Start. --- You can then close the form 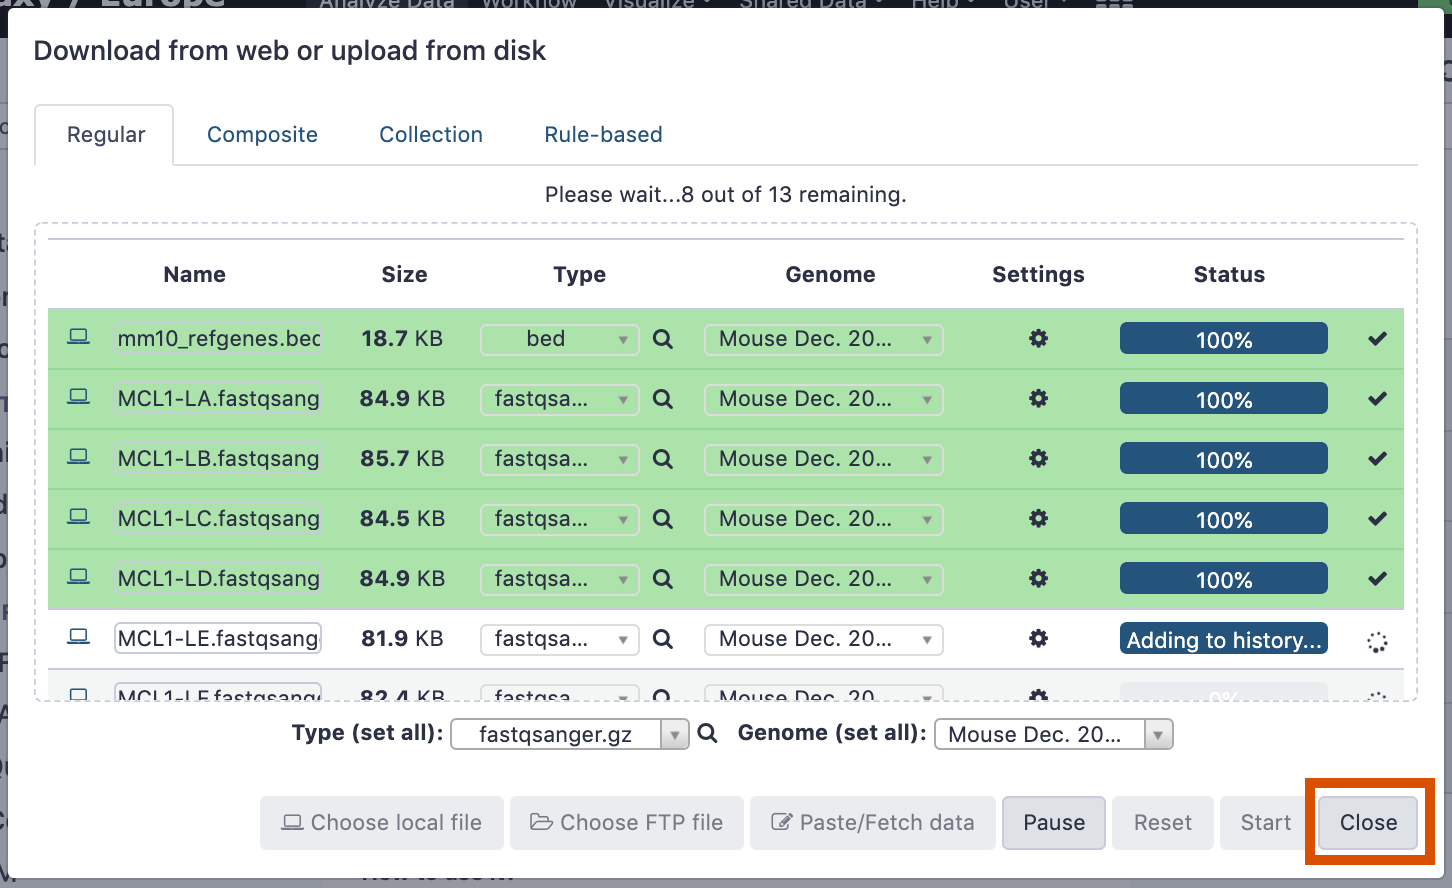 ??? --- All the items will appear in your history 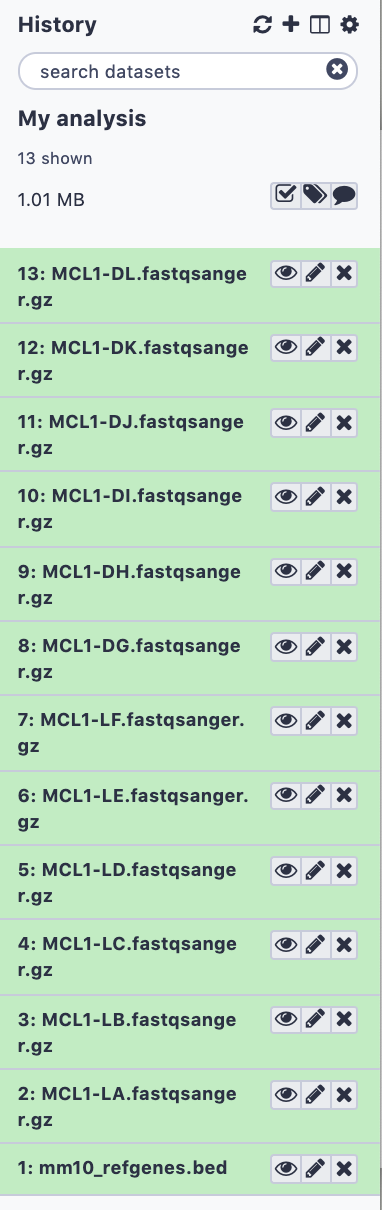 and are ready to use when green. --- ## Directly enter text --- - Sometimes it's useful to file content directly. - only works if your dataset is tiny - choose **Paste/Fetch data** 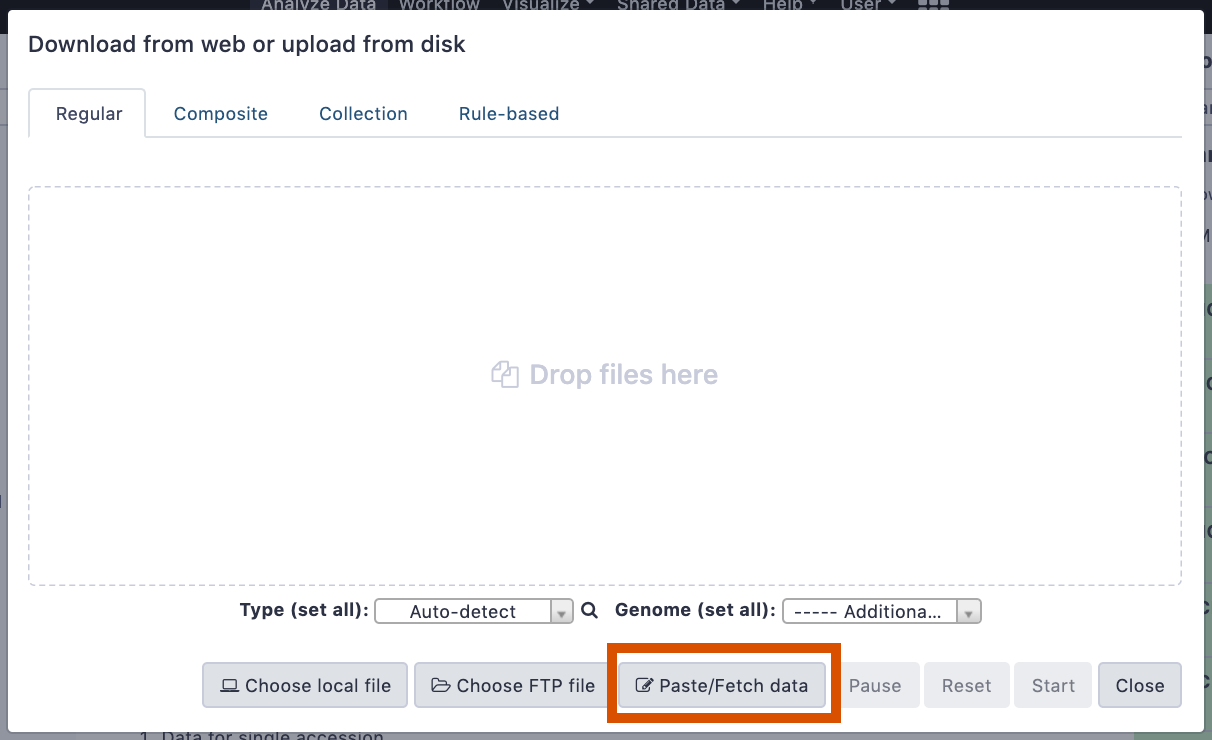 --- Enter the data by typing (or pasting) it in the input box: 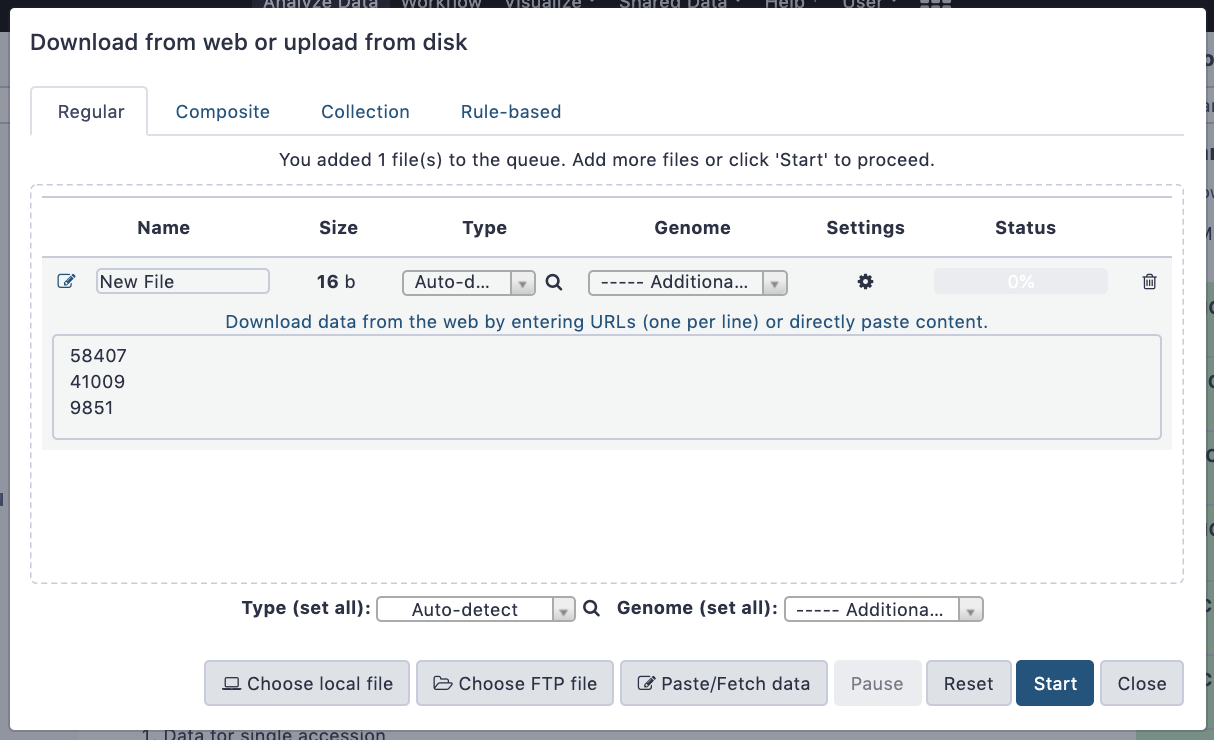 You can also set the datatype and build. *Click* **Start**, and then **Close**, and the new item shows up as **Pasted Entry** in your history. --- ## Import using URL --- The data might already be available on a web server somewhere. To avoid downloading data to your computer and uploading to Galaxy in two steps, you can instruct Galaxy to directly fetch the data from a given URL.  Select **Paste/Fetch data** --- Enter the URLs (one per line) into the input box: 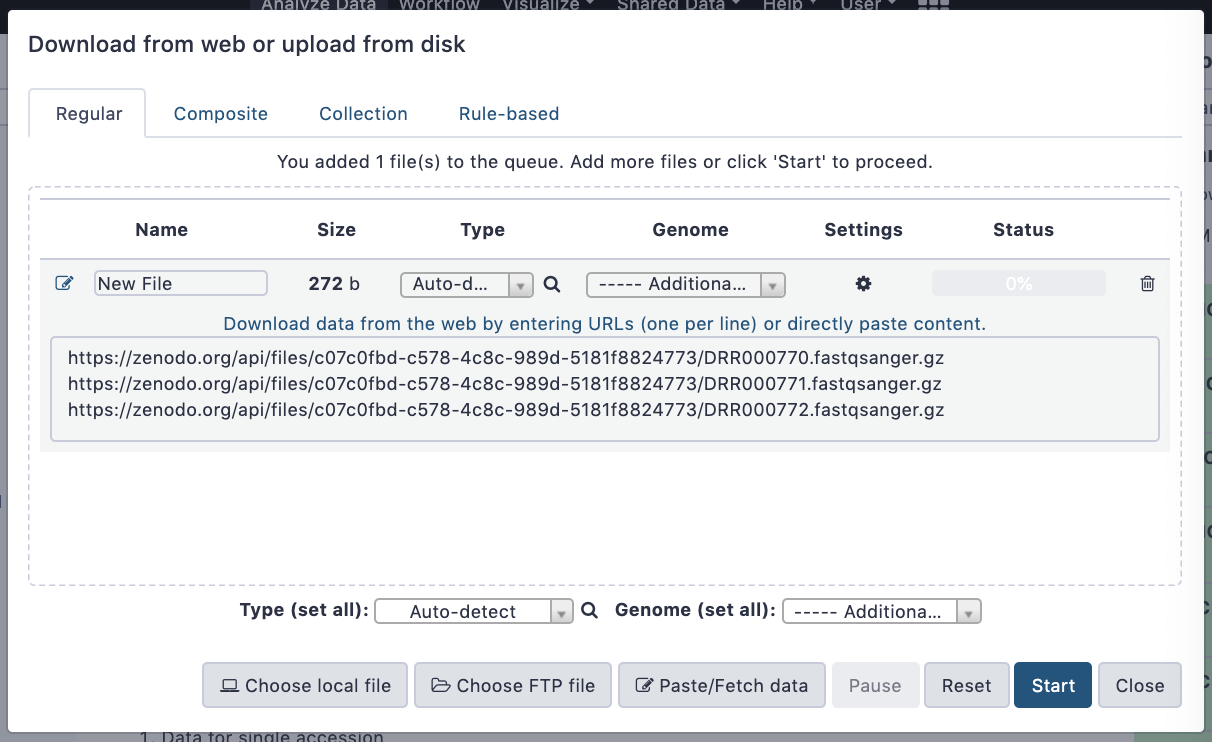 *Click* **Start**, and then **Close**, and the new items show up in your history with the URL as their name. --- # Import using FTP --- - Why use FTP? - Older Galaxies did not support uploading files larger than 2GB in size - Many people are very comfortable using FTP to upload large datasets and you can sometimes resume interrupted uploads. - How to use FTP - The Galaxy server's administrator must have [enabled FTP](https://galaxyproject.org/admin/config/upload-via-ftp/) on the server - You will need to create an account on that Galaxy Server - You will need to install FTP software, or to run FTP from the shell - See https://galaxyproject.org/ftp-upload/ --- ## Make sure you have an FTP client installed .pull-right[.image-25[]] - [FileZilla](https://filezilla-project.org/) is a free FTP client that is available on [Windows](https://filezilla-project.org/download.php?platform=win64), [MacOS](https://filezilla-project.org/download.php?platform=osx), and [Linux](https://filezilla-project.org/download.php?platform=linux) - There are many other options - If you don't already have an FTP client, download and install FileZilla. --- ## Establish FTP connection to your Galaxy server - Provide - the instance's FTP server name (e.g. usegalaxy.org, ftp.usegalaxy.eu) - your full **username** (usually an email address) and **password** 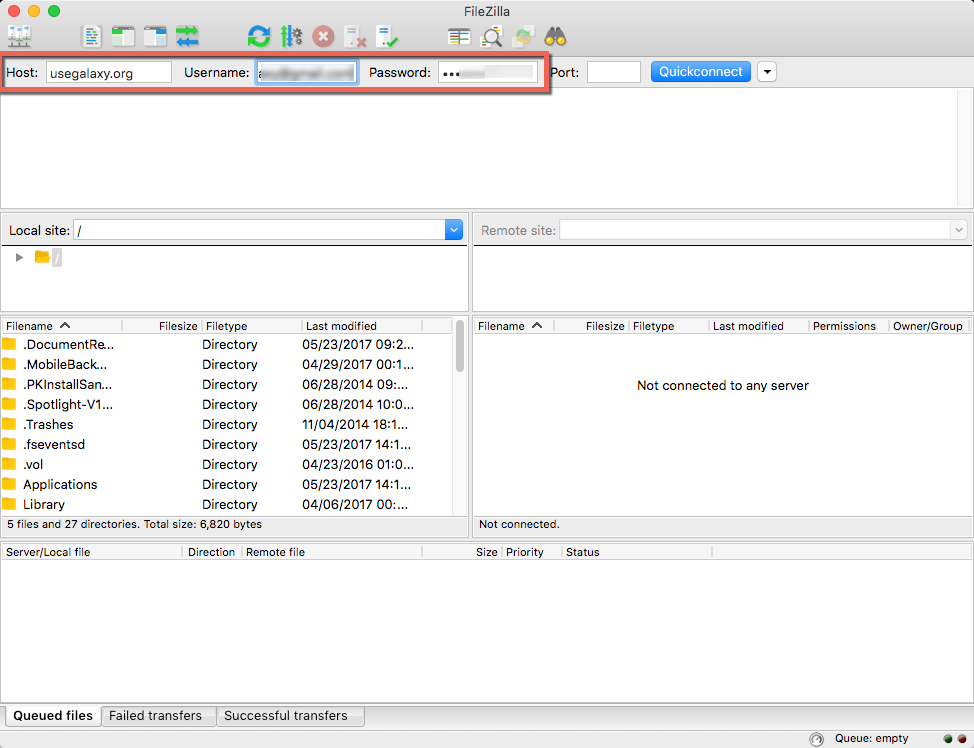 --- 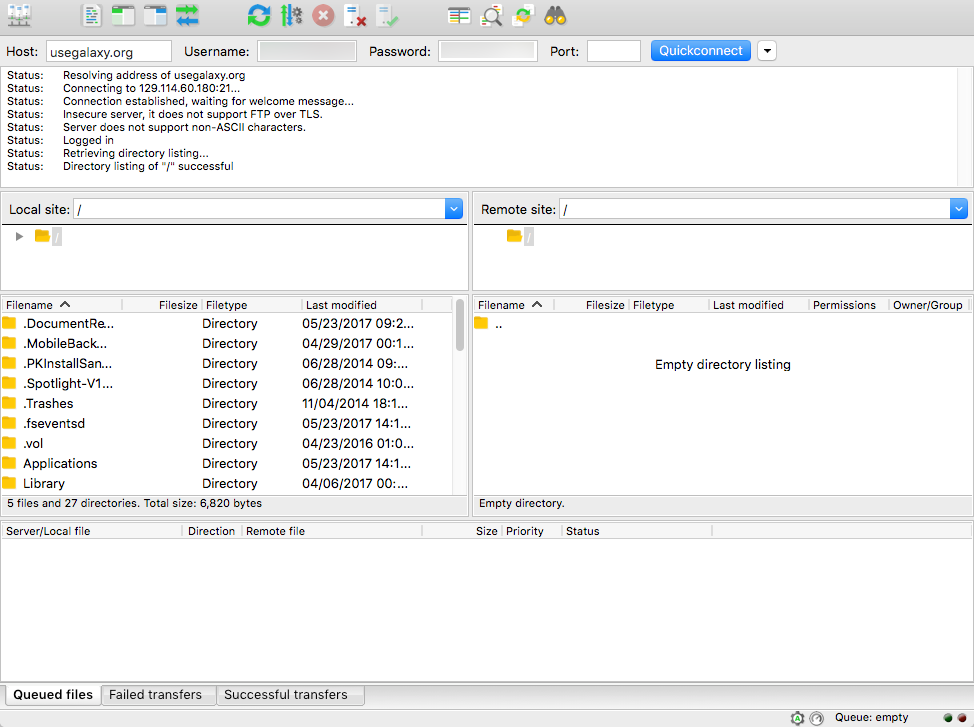 Successfully connected --- 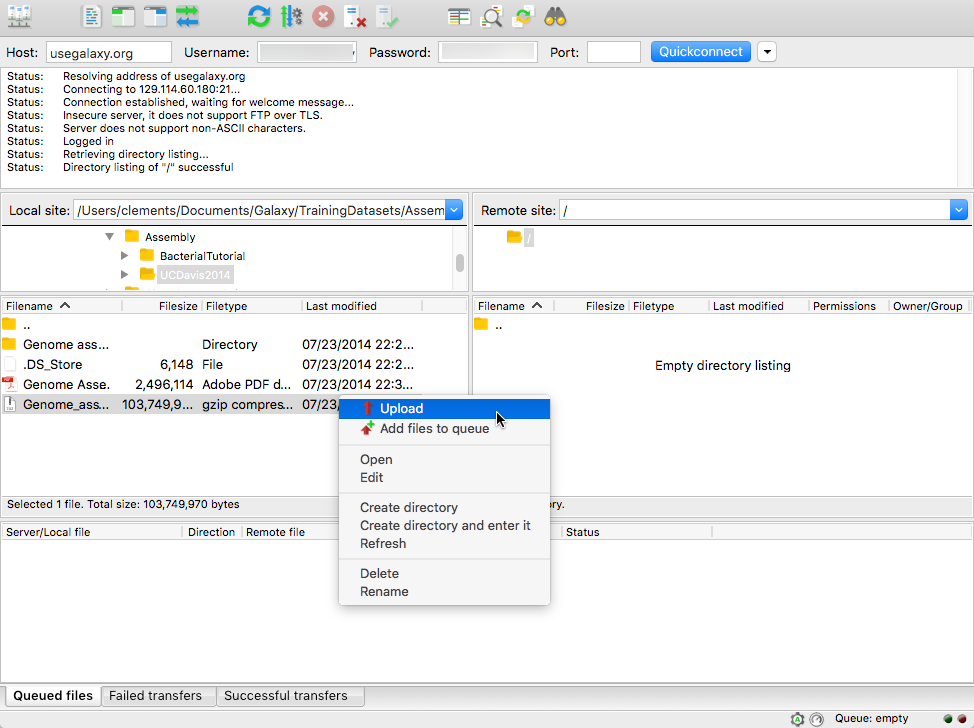 Right click on the files and upload them. --- 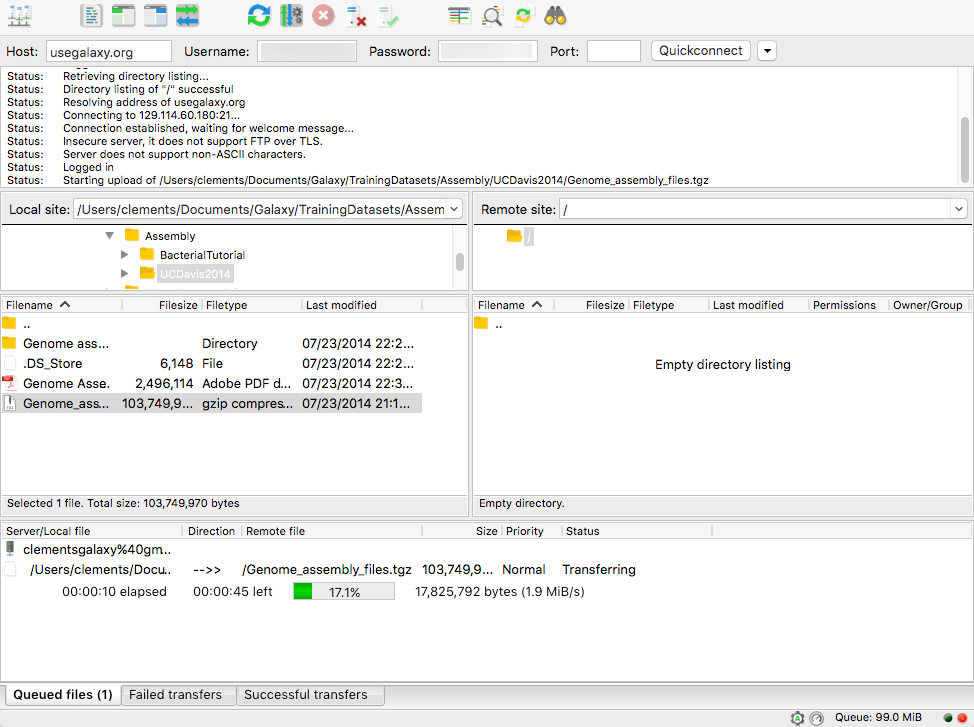 FTP Transfer in progress... --- 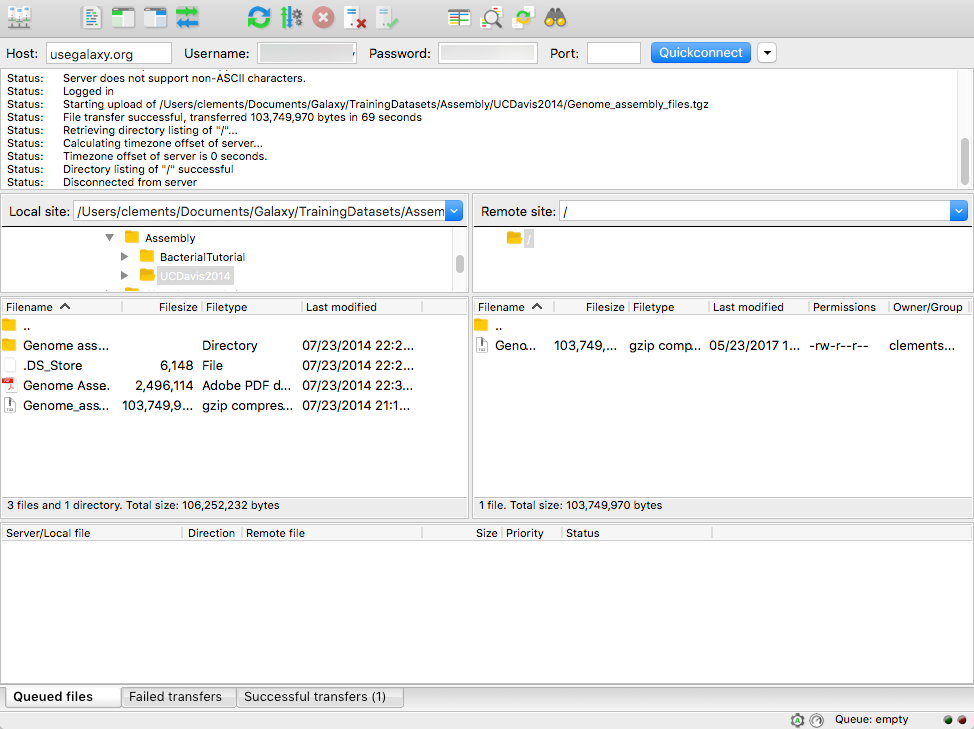 ... and transfer complete. --- # Where did my files go? - File Upload menu -> **Choose FTP files** 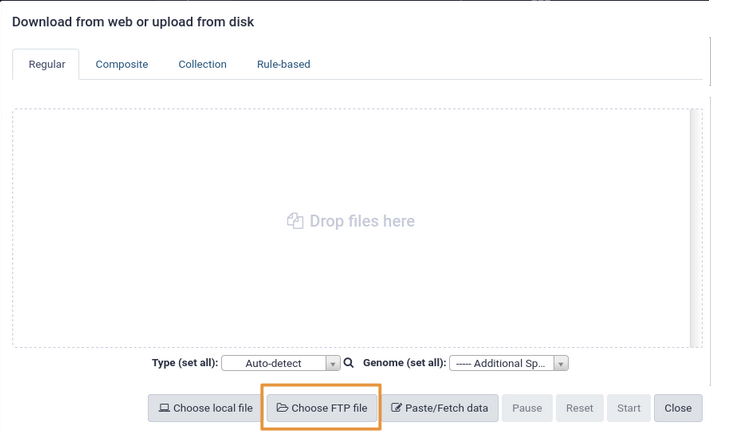 --- - Select files to import into your history - Click **Start** 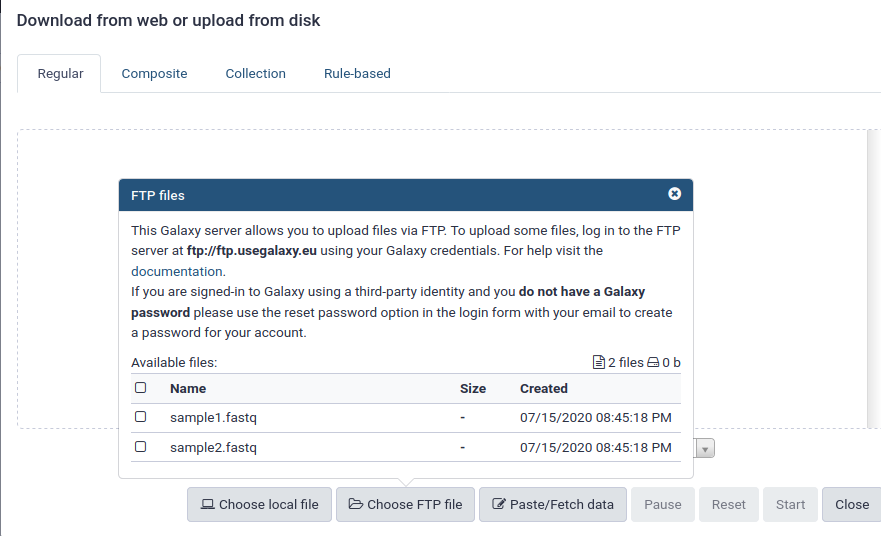 ??? As you can see, this dialog gives connection settings too --- # Import directly into Collection --- - Select **Collection** tab at top of upload menu - Add files as before (upload from computer, paste/fetch, FTP) 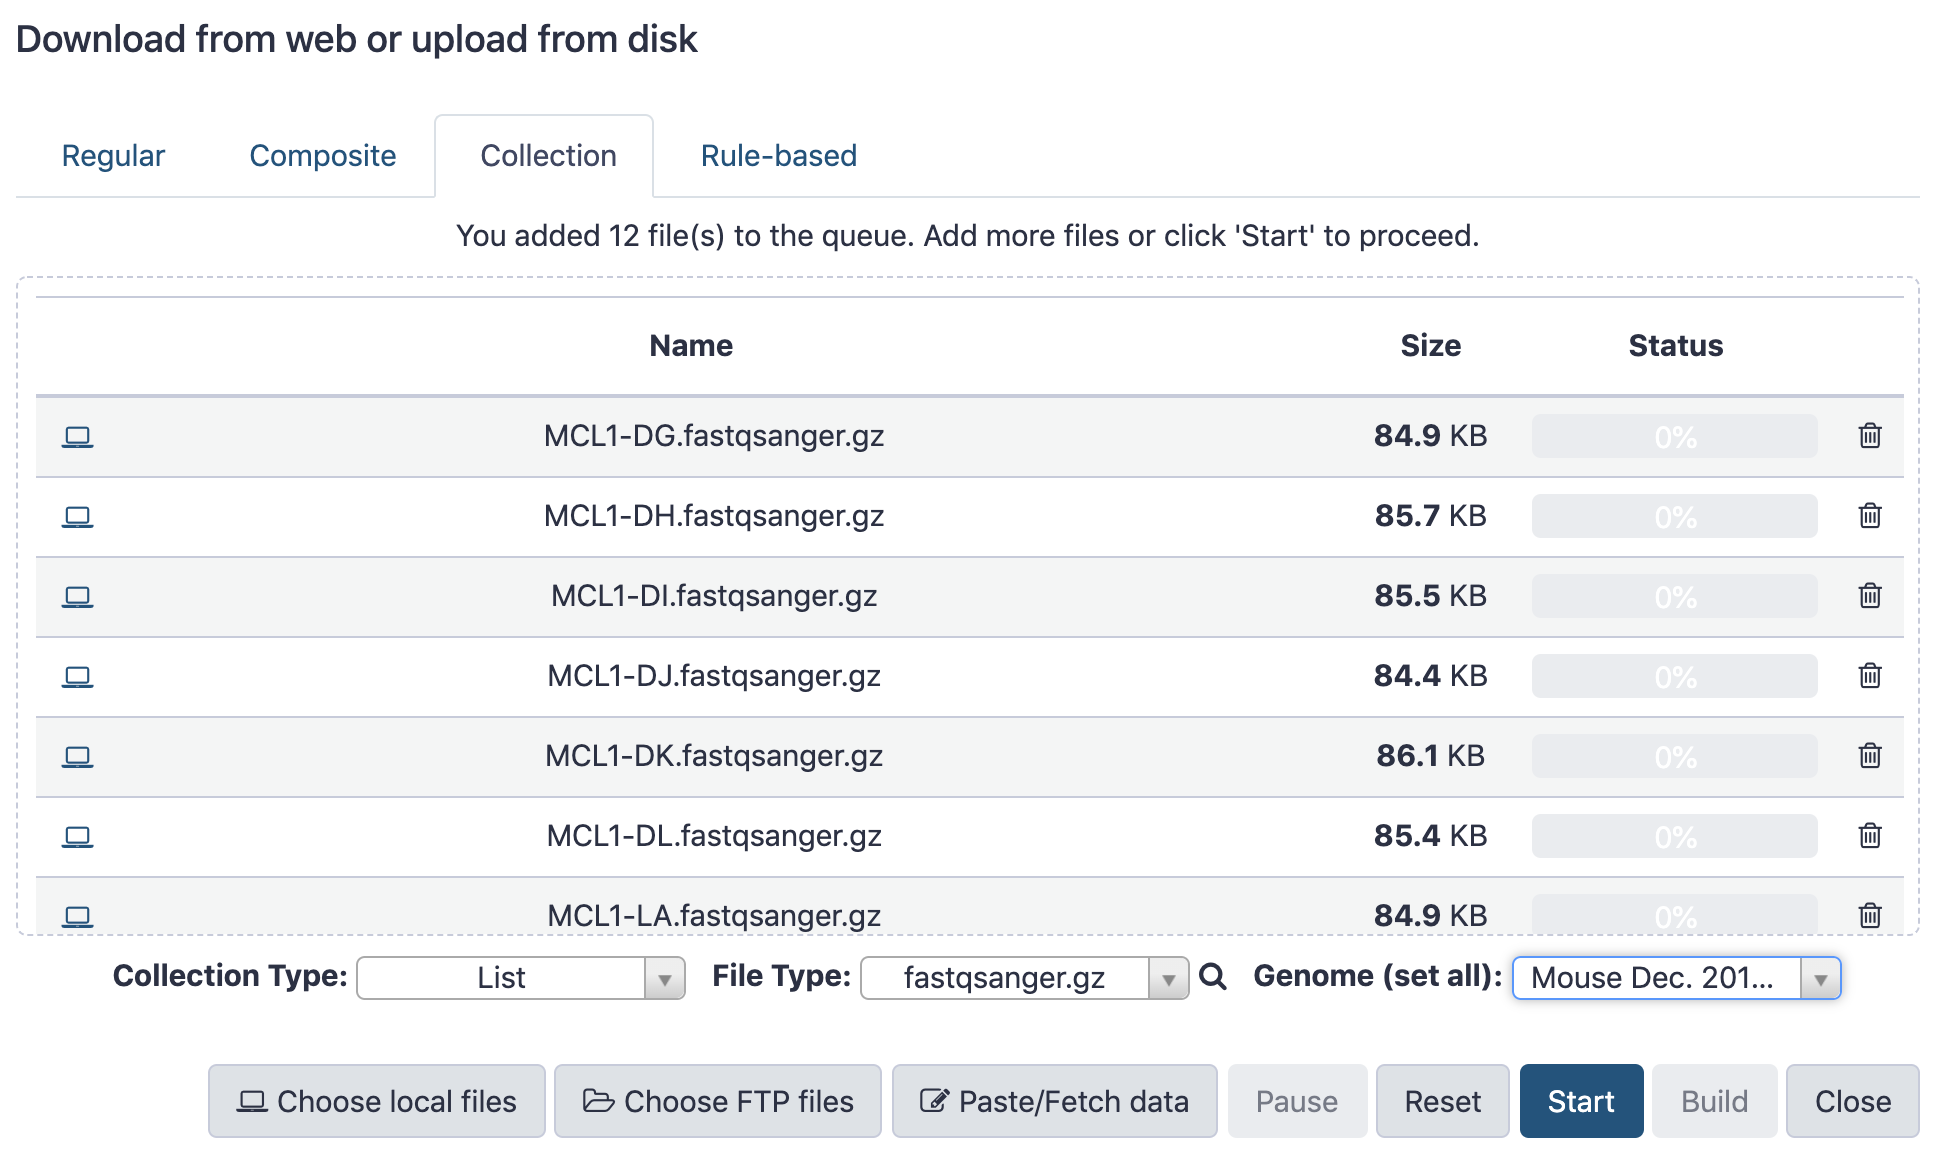 --- - Choose collection type (at bottom) - Set metadata (file type, genome build) - Click "Build" 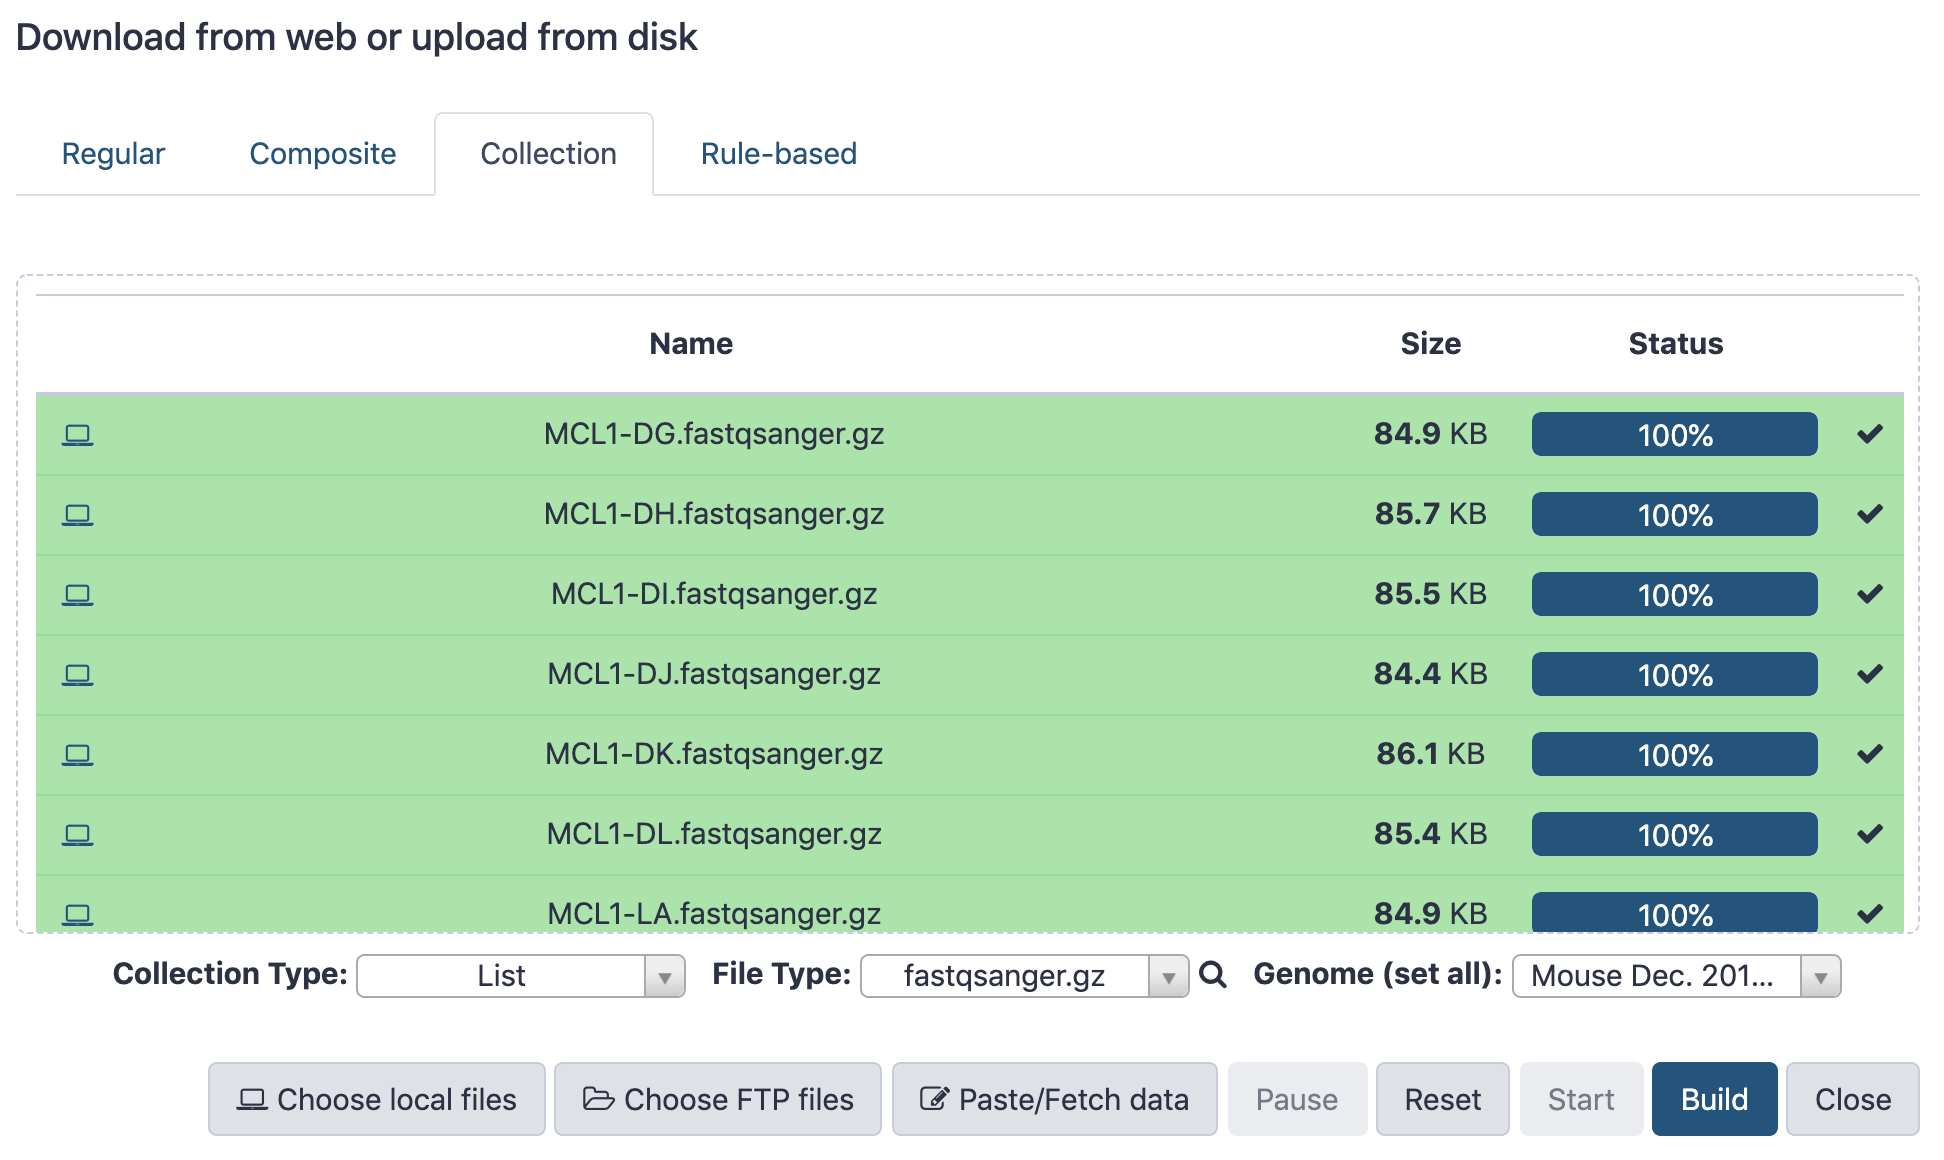 --- - Name your collection - Click **Create** button 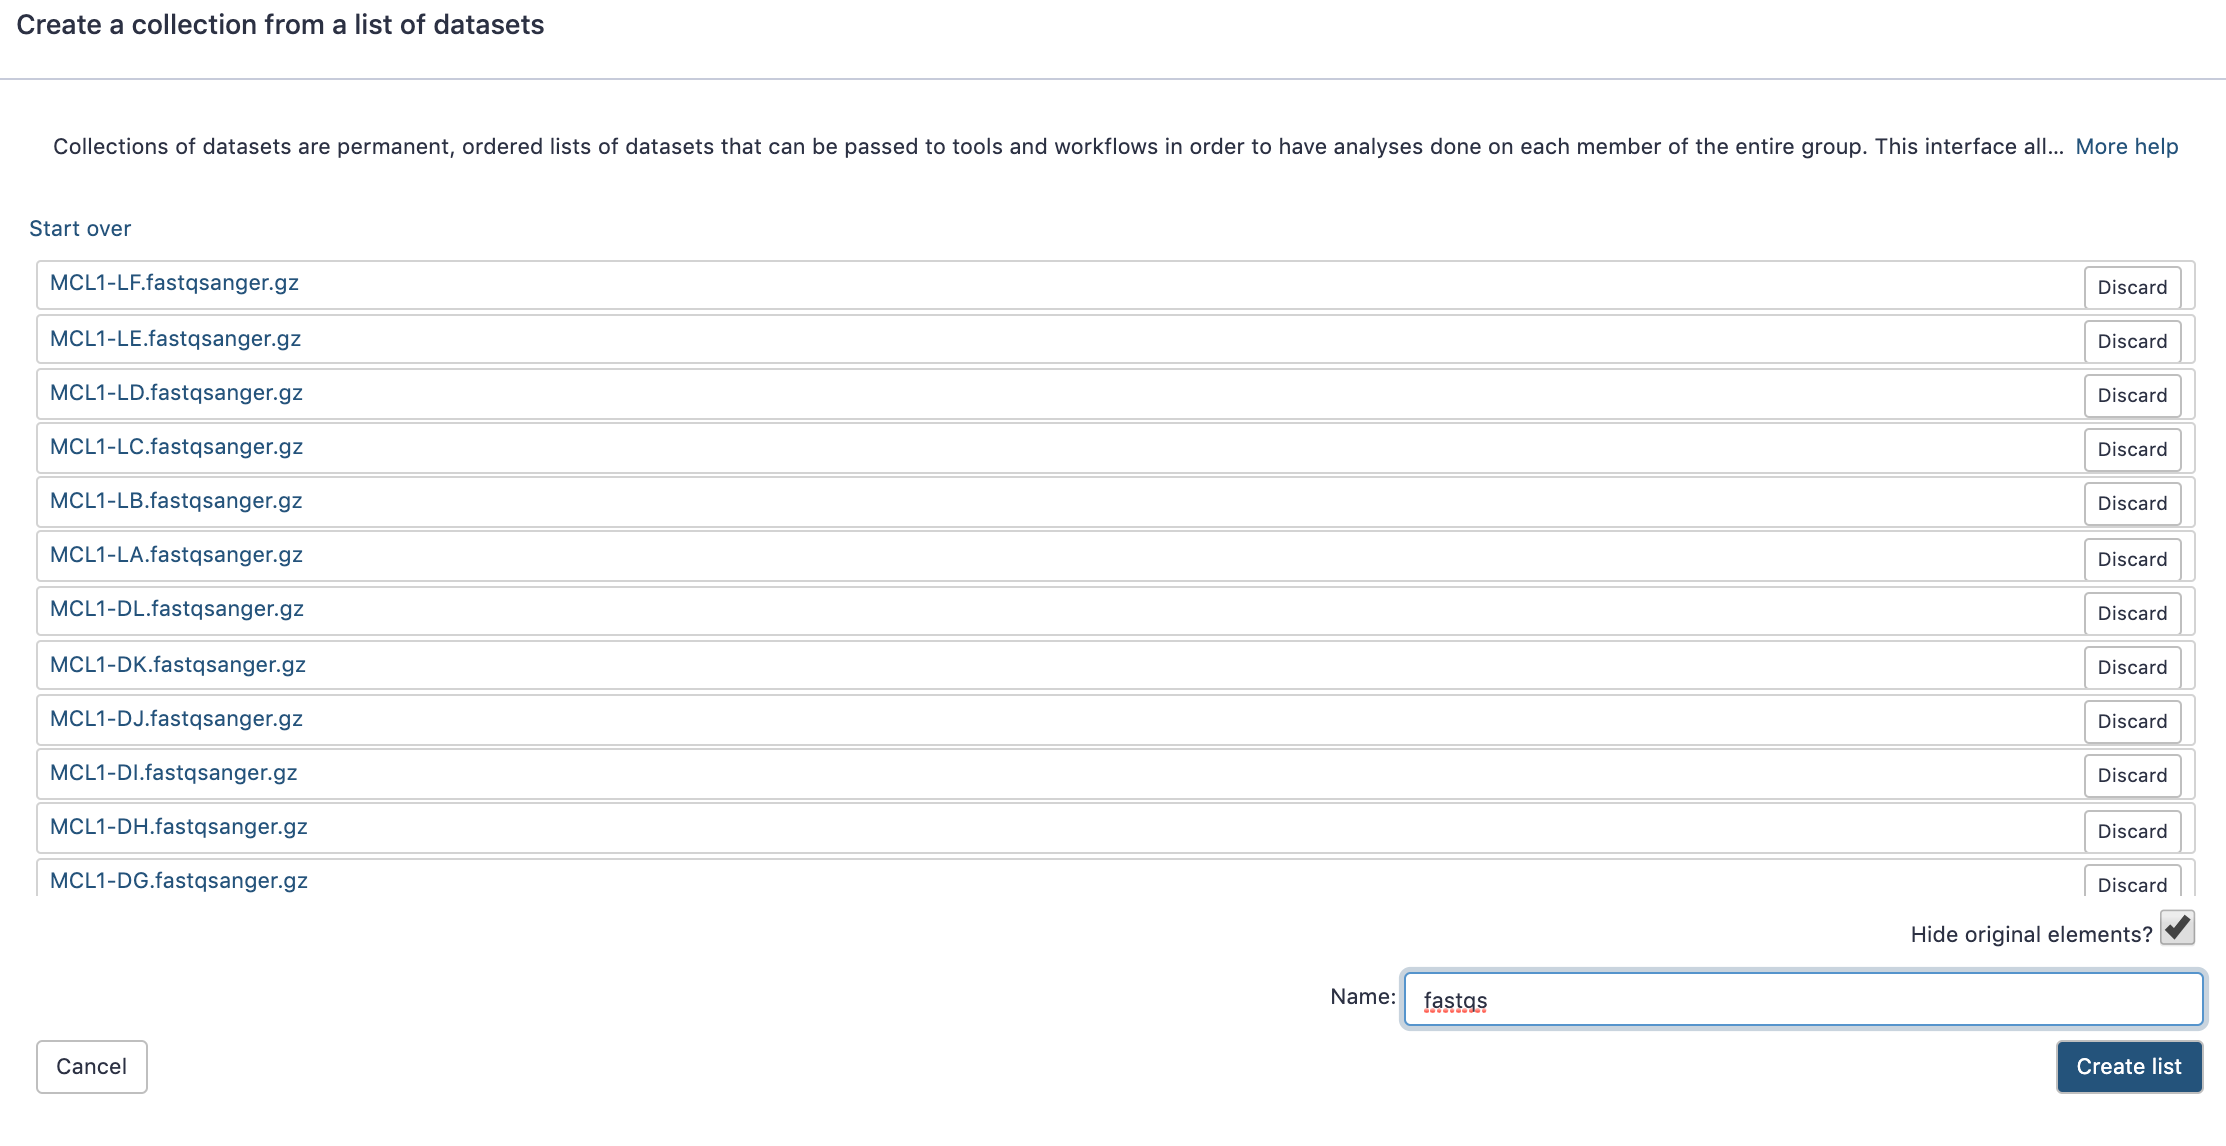 --- - Collection is now imported in your history - Click on it to expand it and view all files in collection 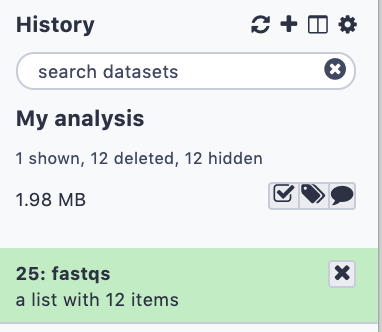 --- # Import using Rule Based uploader --- - When you want to import many files from URLs or Accession IDs directly into collection(s) - Supports advanced "rules" for creating collections from sample sheets - Click **Rule-based** tab at top of file upload window 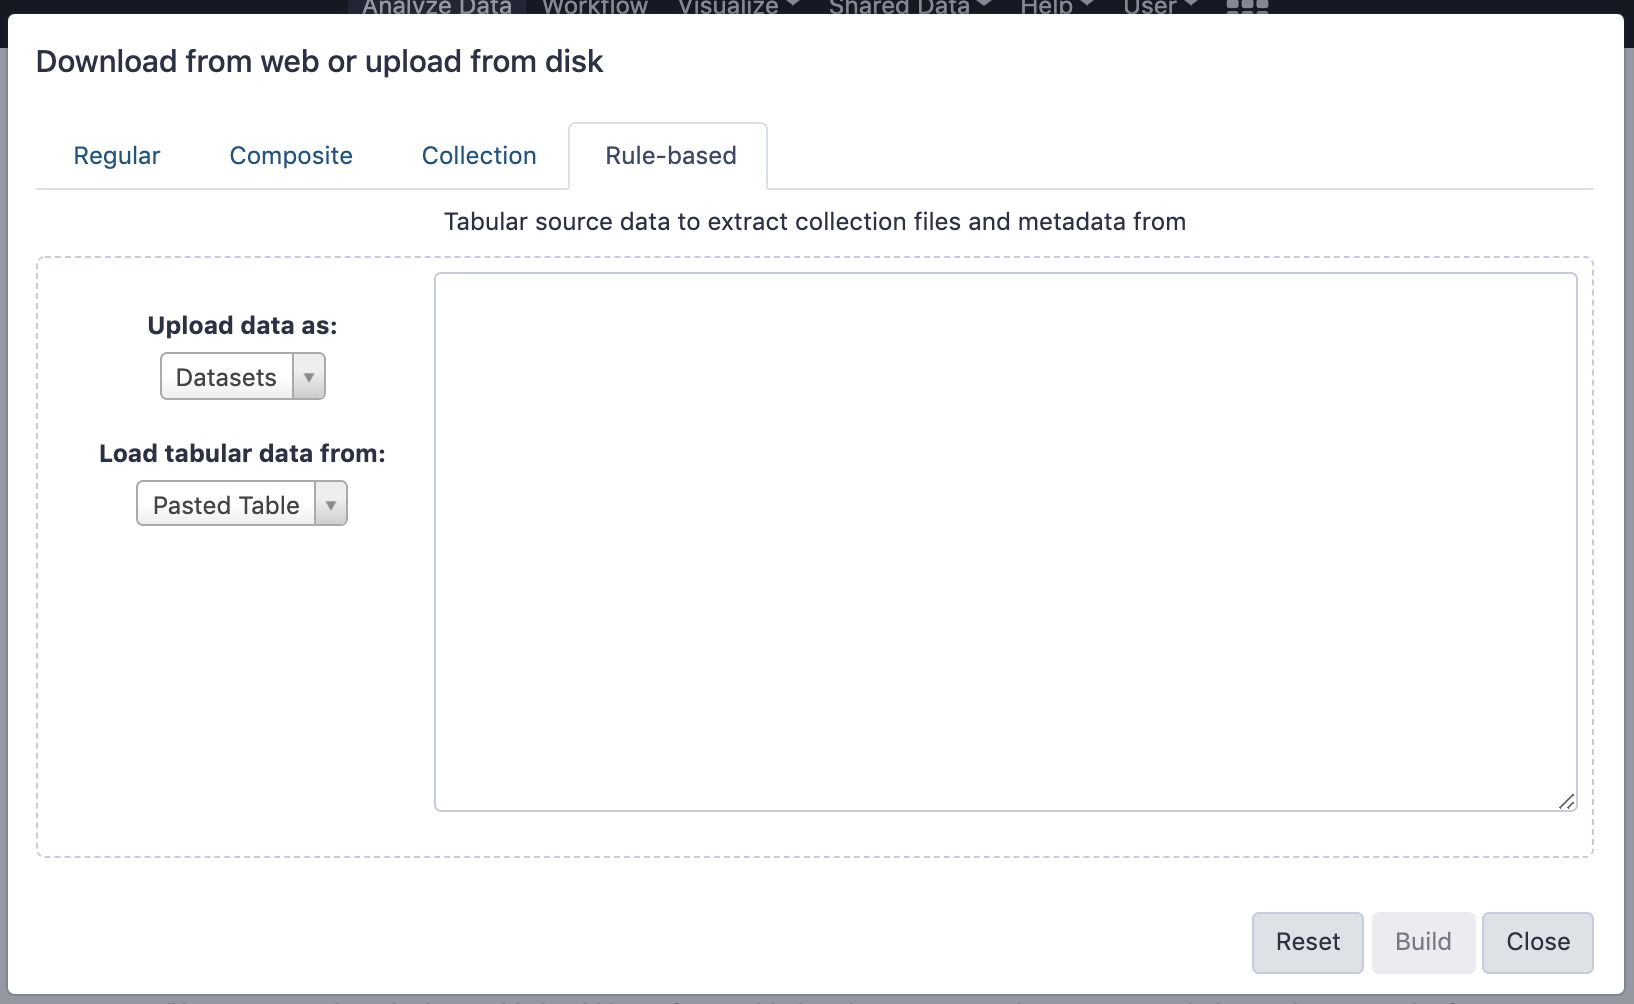 --- # Import using Rule Based uploader Learn how to use it in the dedicated [Rule Based Uploader tutorial](/training-material/topics/galaxy-interface/tutorials/upload-rules/tutorial.html) --- ## Thank You! This material is the result of a collaborative work. Thanks to the [Galaxy Training Network](https://training.galaxyproject.org) and all the contributors! <div markdown="0"> <div class="contributors-line"> <table class="contributions"> <tr> <td><abbr title="These people wrote the bulk of the tutorial, they may have done the analysis, built the workflow, and wrote the text themselves.">Author(s)</abbr></td> <td> <a href="/training-material/hall-of-fame/pajanne/" class="contributor-badge contributor-pajanne"><img src="https://avatars.githubusercontent.com/pajanne?s=36" alt="Anne Pajon avatar" width="36" class="avatar" /> Anne Pajon</a><a href="/training-material/hall-of-fame/tnabtaf/" class="contributor-badge contributor-tnabtaf"><img src="/training-material/assets/images/orcid.png" alt="orcid logo" width="36" height="36"/><img src="https://avatars.githubusercontent.com/tnabtaf?s=36" alt="Dave Clements avatar" width="36" class="avatar" /> Dave Clements</a><a href="/training-material/hall-of-fame/mblue9/" class="contributor-badge contributor-mblue9"><img src="/training-material/assets/images/orcid.png" alt="orcid logo" width="36" height="36"/><img src="https://avatars.githubusercontent.com/mblue9?s=36" alt="Maria Doyle avatar" width="36" class="avatar" /> Maria Doyle</a><a href="/training-material/hall-of-fame/shiltemann/" class="contributor-badge contributor-shiltemann"><img src="/training-material/assets/images/orcid.png" alt="orcid logo" width="36" height="36"/><img src="https://avatars.githubusercontent.com/shiltemann?s=36" alt="Saskia Hiltemann avatar" width="36" class="avatar" /> Saskia Hiltemann</a> </td> </tr> <tr class="reviewers"> <td><abbr title="These people reviewed this material for accuracy and correctness">Reviewers</abbr></td> <td> <a href="/training-material/hall-of-fame/nsoranzo/" class="contributor-badge contributor-badge-small contributor-nsoranzo"><img src="https://avatars.githubusercontent.com/nsoranzo?s=36" alt="Nicola Soranzo avatar" width="36" class="avatar" /></a><a href="/training-material/hall-of-fame/hexylena/" class="contributor-badge contributor-badge-small contributor-hexylena"><img src="https://avatars.githubusercontent.com/hexylena?s=36" alt="Helena Rasche avatar" width="36" class="avatar" /></a><a href="/training-material/hall-of-fame/shiltemann/" class="contributor-badge contributor-badge-small contributor-shiltemann"><img src="https://avatars.githubusercontent.com/shiltemann?s=36" alt="Saskia Hiltemann avatar" width="36" class="avatar" /></a><a href="/training-material/hall-of-fame/bebatut/" class="contributor-badge contributor-badge-small contributor-bebatut"><img src="https://avatars.githubusercontent.com/bebatut?s=36" alt="Bérénice Batut avatar" width="36" class="avatar" /></a><a href="/training-material/hall-of-fame/gallardoalba/" class="contributor-badge contributor-badge-small contributor-gallardoalba"><img src="https://avatars.githubusercontent.com/gallardoalba?s=36" alt="Cristóbal Gallardo avatar" width="36" class="avatar" /></a><a href="/training-material/hall-of-fame/tnabtaf/" class="contributor-badge contributor-badge-small contributor-tnabtaf"><img src="https://avatars.githubusercontent.com/tnabtaf?s=36" alt="Dave Clements avatar" width="36" class="avatar" /></a><a href="/training-material/hall-of-fame/willdurand/" class="contributor-badge contributor-badge-small contributor-willdurand"><img src="https://avatars.githubusercontent.com/willdurand?s=36" alt="William Durand avatar" width="36" class="avatar" /></a></td> </tr> </table> </div> </div> <div style="display: flex;flex-direction: row;align-items: center;justify-content: center;"> <img src="/training-material/assets/images/GTNLogo1000.png" alt="Galaxy Training Network" style="height: 100px;"/> </div> Tutorial Content is licensed under <a rel="license" href="http://creativecommons.org/licenses/by/4.0/">Creative Commons Attribution 4.0 International License</a>.<br/>