Through this tutorial, you will learn in the first part how to produce a protein fasta file from a nucleotide fasta file using Prodigal (it is a tool that predicts protein-coding genes from DNA sequences).
Then, you’ll be using InterProscan to create a tabular. Interproscan is a batch tool to query the InterPro database. It helps identify and predict the functions of proteins by comparing them to known databases.
And finally, you will discover SanntiS both to build genbank and especially to detect and annotate biosynthetic gene clusters (BGCs).
The FASTA file used in this example is, intentionally, a very small fraction of a genome (spanning exactly 1 BGC), and it’s main purpose is to quickly check that all the pieces of the workflow are working.
Hands On: Data Upload
Create a new history for this tutorial and give it a name (for example “Marine Omics: SMBGC annotation”) for you to find it again later if needed.
To create a new history simply click the new-history icon at the top of the history panel:
Import the file with this link https://figshare.com/ndownloader/files/48574534and name it BGC0001472.fna
Copy the link location
Click galaxy-uploadUpload at the top of the activity panel
Select galaxy-wf-editPaste/Fetch Data
Paste the link(s) into the text field
Press Start
Close the window
Rename the datasets BGC0001472.fna
Click on the galaxy-pencilpencil icon for the dataset to edit its attributes
In the central panel, change the Name field
Click the Save button
Hands-on: Choose Your Own Tutorial
This is a 'Choose Your Own Tutorial' (CYOT) section (also known as 'Choose Your Own Analysis' (CYOA)), where you can select between multiple paths. Click one of the buttons below to select how you want to follow the tutorial
Do you want to run the workflow or to discover the tools one by one ?
Import and launch the workflow
Hands On: Import the workflow
Click on Workflow on the top menu bar of Galaxy. You will see a list of all your workflows.
Option 1: use the URL
- Click on galaxy-upload Import at the top-right of the screen
- Paste the URL of the workflow into the box labelled “Archived Workflow URL” https://earth-system.usegalaxy.eu/u/marie.josse/w/marine-omics-identifying-biosynthetic-gene-clusters
Option 2: use the workflow name
- Click on Public workflows at the top-right of the screen
Search for Marine Omics identifying biosynthetic gene clusters
In the workflow preview box click on galaxy-upload Import
Click the Import workflow button
Hands On: Run the workflow
Click on Workflow on the top menu bar of Galaxy. You will see a list of all your workflows.
Click on the workflow-run (Run workflow) button next to your workflow
/!\ Select Yes for Workflow semi automatic
Configure the workflow as needed with the 2 datasets you uploaded right before (BGC0001472.fna)
Click the Run Workflow button at the top-right of the screen
You may have to refresh your history to see the queued jobs
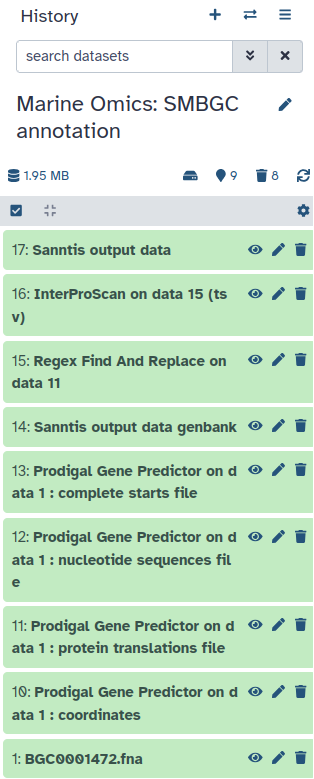
Now you don’t have to do anything else. You should see all the different steps of the workflow appear in your history.
When the workflow is fully completed you should have the following history.
Workflows are a powerful Galaxy feature that allows you to scale up your analysis by performing an end-to-end analysis with a single click of a button. In order to keep provenance of the workflow invocation (an invocation of a workflow means one run or execution of the workflow) it can be exported from Galaxy in the form of a Workflow Run Crate RO-Crate profile.
After the workflow has completed, we can export the RO-Crate. The crate does not appear in your history, but can be accessed from the User -> Workflow Invocations menu on the top bar.
Hands On: Extract a RO-Crate
In the top right of your history, go to galaxy-history-options -> Show Invocations
Click on the Export tab in the expanded view of the workflow invocation.
You should see a page that contains three download options:
- Research Object Crate (RO-Crate)
- BioCompute Object
- File
Click on the Generategalaxy-download option of the RO-Crate box (1st box)
Great work! You have created a Workflow Run Crate. This makes it easy to track the provenance of the executed workflow.
Prodigal Gene Predictor: generate a protein fasta file
Prodigal Gene Predictor
Prodigal is a tool that predicts protein-coding genes from DNA sequences. It takes a nucleotide FASTA file as input and identifies regions that are likely to code for proteins. The output is a protein FASTA file where each sequence represents a predicted protein. Some of these sequences end with an asterisk (*), which marks the end of a complete protein sequence identified by Prodigal. This asterisk is added when Prodigal detects a full protein-coding region that ends with a stop codon. Sequences without an asterisk either represent partial proteins or do not end in a typical stop codon.
Hands On: Run prodigal
Prodigal Gene Predictor ( Galaxy version 2.6.3+galaxy0) with the following parameters:
param-file“Specify input file”: BGC0001472.fna (Input the nucleotide fasta file)
“Specify mode”: Meta : Anonymous sequences, analyze using preset training files, ideal for metagenomic data or single short sequences
You don’t need to change any other parameters leave them on the default input.
Click on Run Tool
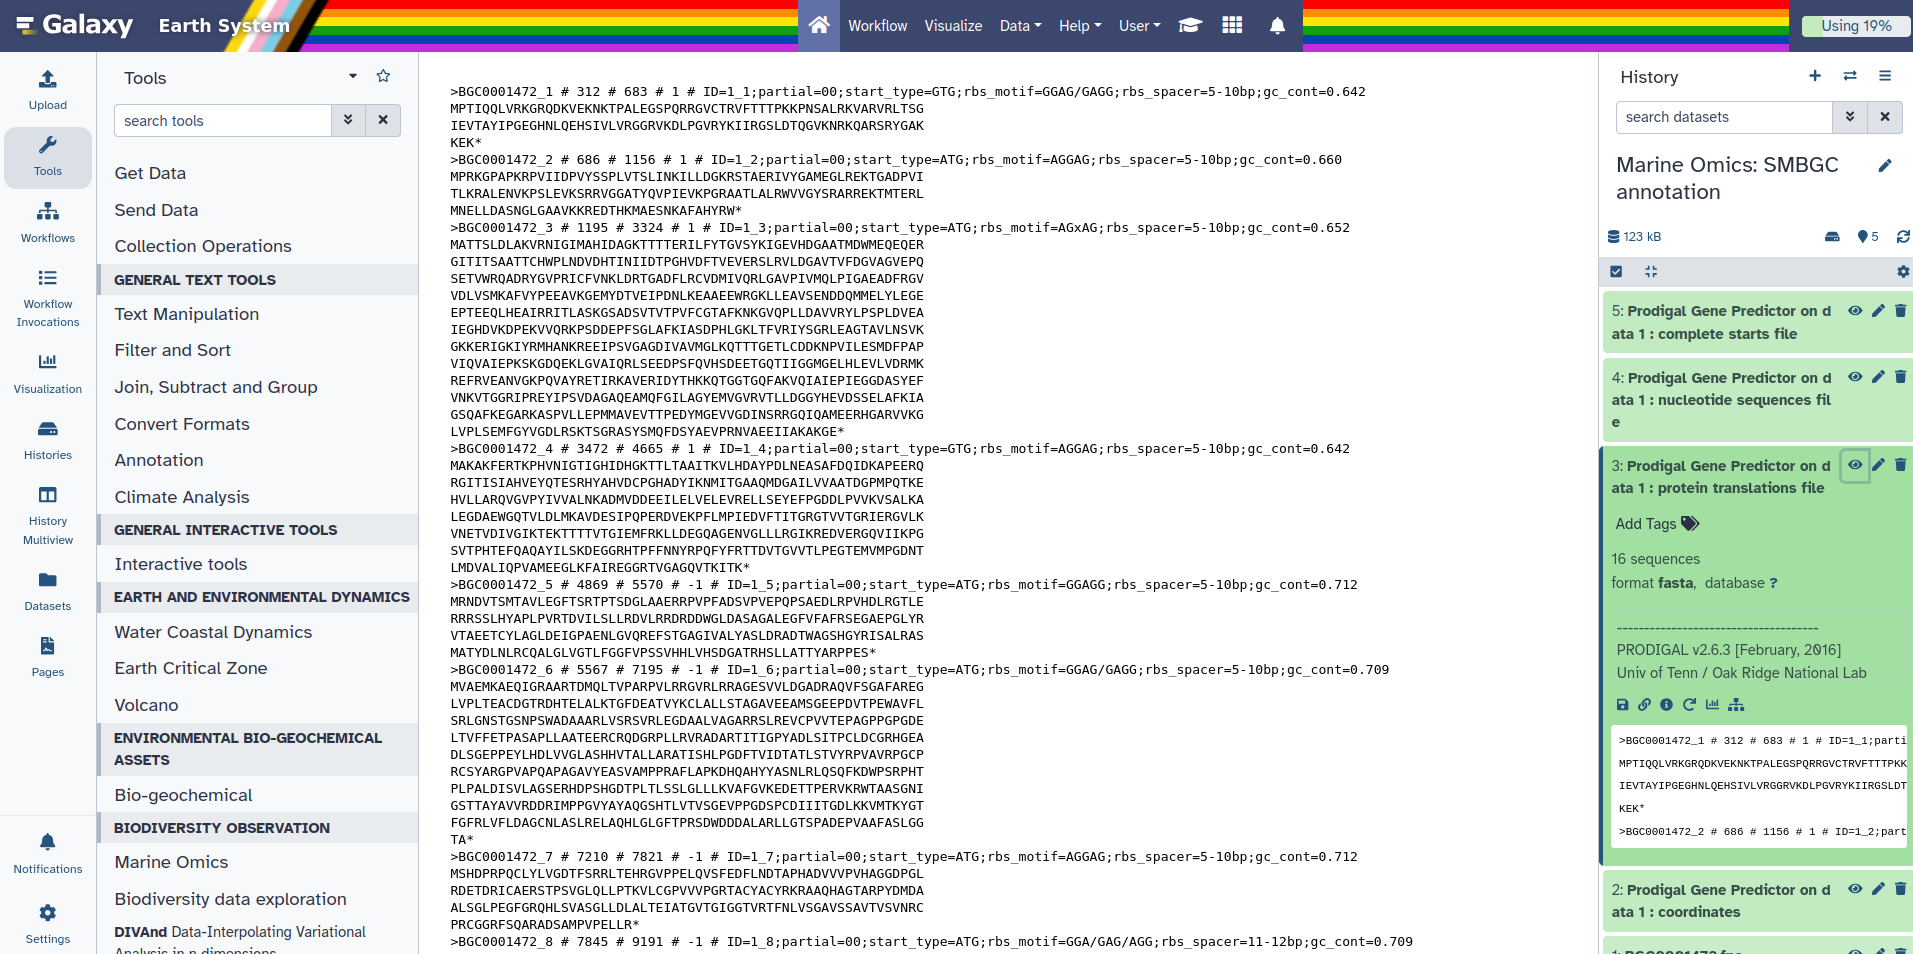
You should have 4 new outputs appearing in your history. In these outputs you should have Prodigal Gene Predictor on data 1 : protein translations file.
You can click on it and then click on the galaxy-eye (eye).
You can notice here that at each end of the sequence there’s a *. Later on we will need to remove this star. But, first we are going to use this protein file to build the Genbank that SanntiS need to make a SMBGC annotation.
SanntiS for building a Genbank file
This step combines the original nucleotide sequences with the cleaned protein sequences to create a GenBank format file. This format is widely used for storing and organising information about DNA sequences and their annotations. In this step, the DNA sequences and their corresponding coding regions are transformed into a format that is suitable for SanntiS.
Hands On: Build Genbank
SanntiS biosynthetic gene clusters ( Galaxy version 0.9.3.5+galaxy1) with the following parameters:
“Do you want to build a genbank or to make a SMBGC Annotation?”: Build genbank
param-file“Input a nucleotide fasta file”: BGC0001472.fna (Input the nucleotide fasta file)
param-file“Input a protein fasta file”: Prodigal Gene Predictor on data 1 : protein translations file (output of Prodigal Gene Predictortool)
Remember earlier we noticed the star * in the protein fasta file ?
Now is the time to remove it !
The asterisks at the end of some protein sequences are informative but can cause issues with some analysis tools. In this step, we remove these asterisks to produce a clean protein FASTA file, making it ready for further analysis.
Hands On: Remove *
Regex Find And Replace ( Galaxy version 1.0.3) with the following parameters:
param-file“Select lines from”: Prodigal Gene Predictor on data 1 : protein translations file (output of Prodigal Gene Predictortool)
In “Check”:
param-repeat“Insert Check”
“Find Regex”: \*$
“Replacement”: `` (leave an empty box there)
Click on Run Tool
Check if the * were well removed.
InterProScan
InterProScan is a tool that helps identify and predict the functions of proteins by comparing them to known databases. This tool analyses the protein sequences and produces an output file containing detailed information about the possible functions, domains, and families associated with these proteins.
Hands On: Task description
InterProScan ( Galaxy version 5.59-91.0+galaxy3) with the following parameters:
param-file“Protein FASTA File”: Regex Find And Replace on data ** (output of Regex Find And Replacetool)
“Use applications with restricted license, only for non-commercial use?”: No
You can leave all the other parameters on the default input.
SanntiS is a tool specifically designed to detect and annotate biosynthetic gene clusters (BGCs). It uses neural networks trained on InterPro signatures to achieve high accuracy in identifying BGCs in both genomic and metagenomic datasets 1. A significant benefit of using SanntiS is that your results will be comparable with a large number of datasets, including over 5,000 marine metagenomic assemblies archived in the MGnify resource. This tool provides valuable insights into the biosynthetic potential of organisms or environmental samples. The final output is a GFF file containing detailed BGC annotations, which can be used for further analyses or applications.
Hands On: Identify biosynthetic gene clusters
SanntiS biosynthetic gene clusters ( Galaxy version 0.9.3.5+galaxy1) with the following parameters:
“Do you want to build a genbank or to make a SMBGC Annotation?”: Run SanntiS
param-file“Input the tabular file from InterProScan”: InterProScan on data ** (output of InterProScantool)
param-file“Input a Genbank file”: SanntiS output data genbank (output of SanntiS biosynthetic gene clusterstool)
Click on Run Tool
Finally, you should have one gff3 file in your history under SanntiS output data
Further information, including links to documentation and original publications, regarding the tools, analysis techniques and the interpretation of results described in this tutorial can be found here.
Feedback
Did you use this material as an instructor? Feel free to give us feedback on how it went.
Did you use this material as a learner or student? Click the form below to leave feedback.
Hiltemann, Saskia, Rasche, Helena et al., 2023 Galaxy Training: A Powerful Framework for Teaching! PLOS Computational Biology 10.1371/journal.pcbi.1010752
Batut et al., 2018 Community-Driven Data Analysis Training for Biology Cell Systems 10.1016/j.cels.2018.05.012
@misc{ecology-marine_omics_bgc,
author = "Marie Josse",
	title = "Marine Omics identifying biosynthetic gene clusters (Galaxy Training Materials)",
	year = "",
	month = "",
	day = "",
	url = "\url{https://training.galaxyproject.org/training-material/topics/ecology/tutorials/marine_omics_bgc/tutorial.html}",
	note = "[Online; accessed TODAY]"
}
@article{Hiltemann_2023,
	doi = {10.1371/journal.pcbi.1010752},
	url = {https://doi.org/10.1371%2Fjournal.pcbi.1010752},
	year = 2023,
	month = {jan},
	publisher = {Public Library of Science ({PLoS})},
	volume = {19},
	number = {1},
	pages = {e1010752},
	author = {Saskia Hiltemann and Helena Rasche and Simon Gladman and Hans-Rudolf Hotz and Delphine Larivi{\`{e}}re and Daniel Blankenberg and Pratik D. Jagtap and Thomas Wollmann and Anthony Bretaudeau and Nadia Gou{\'{e}} and Timothy J. Griffin and Coline Royaux and Yvan Le Bras and Subina Mehta and Anna Syme and Frederik Coppens and Bert Droesbeke and Nicola Soranzo and Wendi Bacon and Fotis Psomopoulos and Crist{\'{o}}bal Gallardo-Alba and John Davis and Melanie Christine Föll and Matthias Fahrner and Maria A. Doyle and Beatriz Serrano-Solano and Anne Claire Fouilloux and Peter van Heusden and Wolfgang Maier and Dave Clements and Florian Heyl and Björn Grüning and B{\'{e}}r{\'{e}}nice Batut and},
	editor = {Francis Ouellette},
	title = {Galaxy Training: A powerful framework for teaching!},
	journal = {PLoS Comput Biol}
}
Funding
These individuals or organisations provided funding support for the development of this resource
Questions:


 Open image in new tab
Open image in new tab
Open image in new tab
Open image in new tab
 Open image in new tab
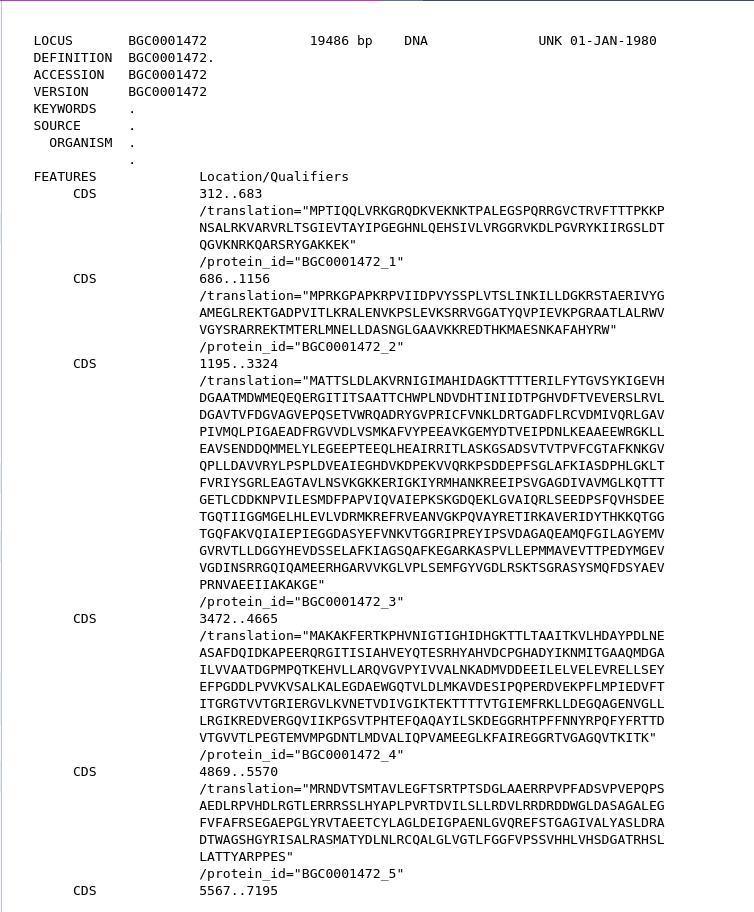 Open image in new tab
 Open image in new tab
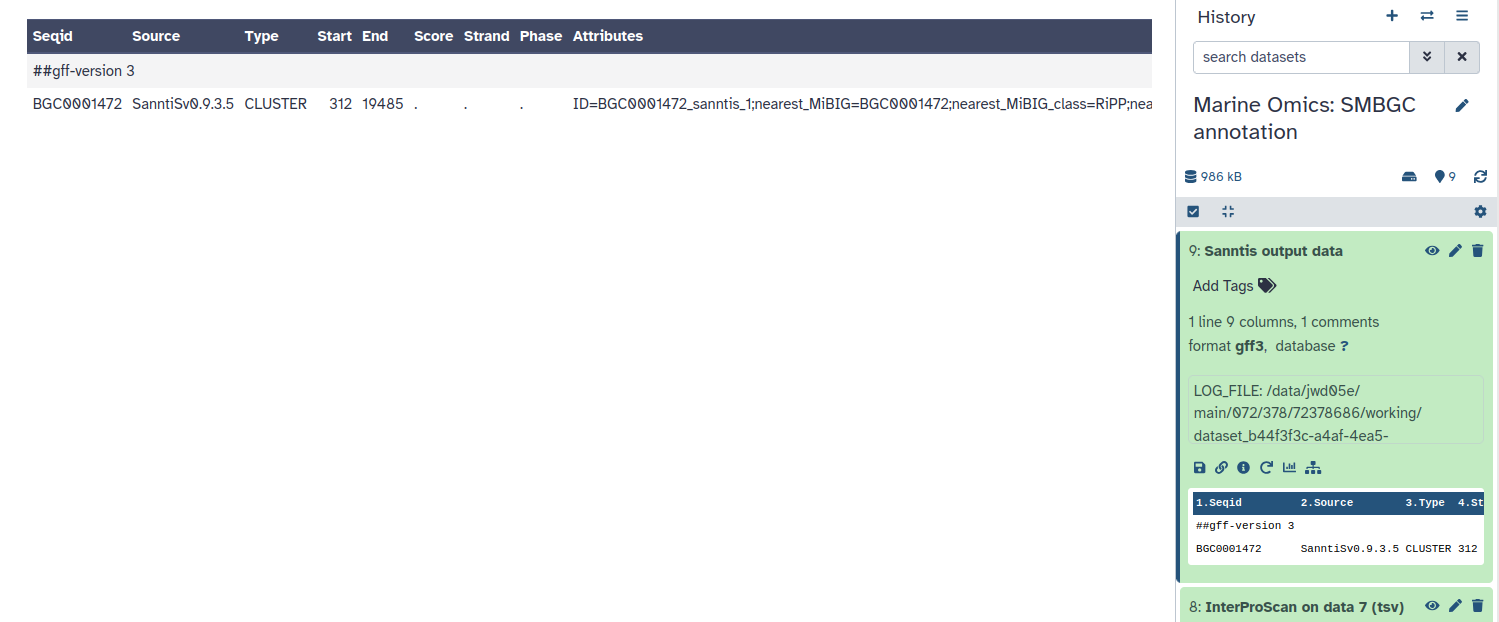 Open image in new tab

