Galaxy is well-known as a web-based data analysis platform which provides a graphical interface for executing common bioinformatics tools in a reproducible manner. However, Galaxy is not just a user-friendly interface for executing one tool at a time. It provides two very useful features which allow scaling data analyses up to a high-throughput level: dataset collections and workflows.
Dataset collections represent groups of similar datasets. This doesn’t sound especially exciting, but it gets interesting when a tool is executed using a collection as input, where a single dataset would normally be created. In this case, Galaxy creates a new job for every dataset contained within the collection, and stores the tool outputs in a new collection (or collections, if there are multiple outputs) with the same size and structure as the input. This process is referred to as ‘mapping over’ the input collection.
Workflows are pipelines made up of multiple Galaxy tools executed in sequence. When a workflow is executed, Galaxy schedules all the jobs which need to be run to produce the workflow outputs. They will remain scheduled (represented by the familiar grey color in the Galaxy history) until the required inputs become available. After they complete, they will make their outputs available, which allows the next set of jobs to begin.
Between them, collections and workflows make it possible to scale-up from running a single tool on a single dataset to running multiple tools on multiple datasets.
Why use the command line?
All the functionality described so far is available through the graphical interface. So why use the command line? Let’s consider a couple of scenarios:
You want to run some molecular dynamics simulations to perform free energy calculations for protein-ligand binding. You have a compound library of 1000 ligands and would like to run an ensemble of 10 simulations for each. You would like to have the analysis for each ligand in a separate history, with the ensembles represented as dataset collections, which means you need to invoke your workflow 1000 times - theoretically possible to do in the graphical interface, but you probably want to avoid it if possible.
You are conducting research on a virus which is responsible for a deadly pandemic. New genomic data from the virus is being produced constantly, and you have a variant calling workflow which will tell you if a particular sample contains new mutations. You would like to run this workflow as soon as the data appears - every day perhaps, or even every hour. This will be quite tough if you have to click a button each time yourself.
If you are encountering similar problems as these in your research with Galaxy, this tutorial is for you! We will explain how to trigger workflow execution via the command line using Planemo, and provide some tips on how to write scripts to automate the process. The result will be a bot which takes care of the the whole analysis process for you.
The main tool we will use in this tutorial is Planemo, a command-line tool with a very wide range of functionality. If you ever developed a Galaxy tool, you probably encountered the planemo test, planemo serve and planemo lint subcommands. In this tutorial we will be using a different subcommand: planemo run.
For the purposes of this tutorial, we assume you have a recent version of Planemo (0.74.4 or later) installed in a virtual environment. If you don’t, please follow the installation instructions.
Hands-on: Choose Your Own Tutorial
This is a 'Choose Your Own Tutorial' (CYOT) section (also known as 'Choose Your Own Analysis' (CYOA)), where you can select between multiple paths. Click one of the buttons below to select how you want to follow the tutorial
A quick tutorial with an existing workflow
Get workflows and data
Workflows and data for this tutorial are hosted on GitHub.
Hands On: Download workflow and data
Download the workflows and data for this tutorial using git clone.
Next, step into the cloned folder and take a look around.
Code In
cd workflow-automation-tutorial
ls
Code Out: Folder contents
example LICENSE pangolin README.md
Of the two subfolders, example/ contains just a toy workflow used in the following to guide you through the basics of running workflows from the command line.
The pangolin/ folder holds the workflow and other material you will use in the second part of the tutorial, in which you will be setting up an automated system for assigning batches of SARS-CoV-2 variant data to viral lineages.
Get the workflow and prepare the job file
For this section, we will use a very simple workflow consisting of two text manipulation tools chained together.
Hands On: Step into and explore the example folder
Code In
cd example
ls
Code Out: Folder contents
tutorial.ga
The tutorial.ga file defines the workflow in JSON format; if we are confident we have a functional workflow, we don’t need to worry about its contents or modify it. However, we need a second file, the so-called ‘job file’, which specifies the particular dataset and parameter inputs which should be used to execute the workflow. We can create a template for this file using the planemo workflow_job_init subcommand.
Hands On: Creating the job file
Run the planemo workflow_job_init subcommand.
Code In: workflow_job_init
planemo workflow_job_init tutorial.ga -o tutorial-init-job.yml
# Now let's view the contentscat tutorial-init-job.yml
The planemo workflow_job_init command identifies the inputs of the workflow provided and creates a template job file with placeholder values for each.
Code Out: File contents
Dataset 1:class:Filepath:todo_test_data_path.extDataset 2:class:Filepath:todo_test_data_path.extNumber of lines:todo_param_value
The job file contains three inputs: two dataset inputs and one integer (parameter input).
Create two files which can be used as inputs:
Code In: Creating the input files
printf"hello\nworld"> dataset1.txt
printf"hello\nuniverse!"> dataset2.txt
ls
Replace the placeholder values in the job file, so that it looks like the following:
Dataset 1:class:Filepath:dataset1.txtDataset 2:class:Filepath:dataset2.txtNumber of lines:3
Now we are ready to execute the workflow with our chosen parameters!
Running the workflow
Now we have a simple workflow, we can run it using planemo run. At this point you need to choose a Galaxy server on which you want the workflow to run. One of the big public servers would be a possible choice. You could also use a local Galaxy instance. Either way, once you’ve chosen a server, the next step is to get your API key.
In your browser, open your Galaxy homepage
Log in, or register a new account, if it’s the first time you’re logging in
Go to User -> Preferences in the top menu bar, then click on Manage API key
If there is no current API key available, click on Create a new key to generate it
Copy your API key to somewhere convenient, you will need it throughout this tutorial
Navigate to the web browser - you should be able to see a new history has been created with the chosen name and tag. One potential disadvantage of the previous command is that it waits until the invoked workflow has fully completed. For our very small example, this doesn’t matter, but for a workflow which takes hours or days to finish, it might be undesirable. Fortunately, planemo run provides a --no_wait flag which exits as soon as the workflow has been successfully scheduled.
Run the planemo run subcommand with the --no_wait flag.
Code In: planemo run
planemo run tutorial.ga tutorial-init-job.yml --galaxy_url <SERVER_URL> --galaxy_user_key <YOUR_API_KEY> --history_name"Test Planemo WF with no_wait"--tags"planemo-tutorial"--no_wait
This time you should see that the planemo run command exits as soon as the two datasets have been uploaded and the workflow has been scheduled.
Running the workflow on a remote external Galaxy instance
Now we have a simple workflow, we can run it using planemo run. At this point you need to choose a Galaxy server on which you want the workflow to run. One of the big public servers would be a possible choice. You could also use a local Galaxy instance. Either way, once you’ve chosen a server, the next step is to get your API key.
In your browser, open your Galaxy homepage
Log in, or register a new account, if it’s the first time you’re logging in
Go to User -> Preferences in the top menu bar, then click on Manage API key
If there is no current API key available, click on Create a new key to generate it
Copy your API key to somewhere convenient, you will need it throughout this tutorial
Hands On: Running our workflow
You can either provide the workflow file .ga or a workflow ID within a Galaxy instance.
Let’s do it simple and “ecologic” with a workflow ID
Get the ID of your workflow just created:
Go to the galaxy-workflows-activityworkflows panel in Galaxy and find the workflow you’ve just created.
Click on galaxy-pencil Edit or history-share Share
The URL in your browser will look something like https://usegalaxy.eu/workflow/editor?id=34d18f081b73cb15. Copy the part after ?id= - this is the workflow ID, in our case: 34d18f081b73cb15
Run the planemo run subcommand.
Code In: planemo run
planemo run <WORKFLOW_ID> Galaxy-Workflow-Fastq_cleaning_and_check-job.xml --galaxy_url <SERVER_URL> --galaxy_user_key <YOUR_API_KEY> --outdir.--download_outputs
Comment: Checking within Galaxy
You may want to check the ongoing process or the results within the Galaxy instance interface.
One potential disadvantage of the previous command is that it waits until the invoked workflow has fully completed. For our very small example, this doesn’t matter, but for a workflow which takes hours or days to finish, it might be undesirable. Fortunately, planemo run provides a --no_wait flag which exits as soon as the workflow has been successfully scheduled.
Planemo provides a useful profile feature which can help simplify long commands. The idea is that flags which need to be used multiple times in different invocations can be combined together and run as a single profile. Let’s see how this works below.
Hands On: Creating and using Planemo profiles
Create a Planemo profile with the following command:
You can view and delete existing profiles using the profile_list and profile_delete subcommands.
Now we can run our workflow yet again using the profile we have created:
Code In: planemo run
planemo run <WORKFLOW ID> tutorial-init-job.yml --profile planemo-tutorial --history_name"Test Planemo WF with profile"--tags"planemo-tutorial"
This invokes the workflow with all the parameters specified in the profile planemo-tutorial.
Using Galaxy workflow and dataset IDs
If you execute the same workflow twice. If you inspect your histories and workflows through the Galaxy web interface, you will see that a new workflow was created on the server for each invocation, and both Dataset 1 and Dataset 2 were uploaded twice. This is undesirable - we are creating a lot of clutter and the uploads are creating additional unnecessary work for the Galaxy server.
Every object associated with Galaxy, including workflows, datasets and dataset collections, have hexadecimal IDs associated with them, which look something like 6b15dfc0393f172c. Once the datasets and workflows we need have been uploaded to Galaxy once, we can use these IDs in our subsequent workflow invocations.
Hands On: Running our workflow using dataset and workflow IDs
Navigate to one of the histories to get dataset IDs for the input datasets. For each one:
Click on the galaxy-infoView details icon on the dataset in the history.
Under the heading Dataset Information, find the row History Content API ID and copy the hexadecimal ID next to it.
Modify tutorial-init-job.yml to look like the following:
Dataset 1:class:File# path: dataset1.txtgalaxy_id:<ID OF DATASET 1>Dataset 2:class:File# path: dataset2.txtgalaxy_id:<ID OF DATASET 2>Number of lines:3
Now we need to get the workflow ID:
Go to the galaxy-workflows-activityworkflows panel in Galaxy and find the workflow you’ve just created.
Click on galaxy-pencil Edit or history-share Share
The URL in your browser will look something like https://usegalaxy.eu/workflow/editor?id=34d18f081b73cb15. Copy the part after ?id= - this is the workflow ID, in our case: 34d18f081b73cb15
Run the planemo run subcommand using the new workflow ID.
Code In: planemo run
planemo run <WORKFLOW ID> tutorial-init-job.yml --galaxy_url <SERVER_URL> --galaxy_user_key <YOUR_API_KEY> --history_name"Test Planemo WF with Planemo"--tags"planemo-tutorial"--no_wait
Ensuring Workflows meet Best Practices
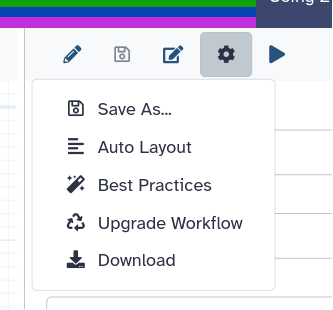
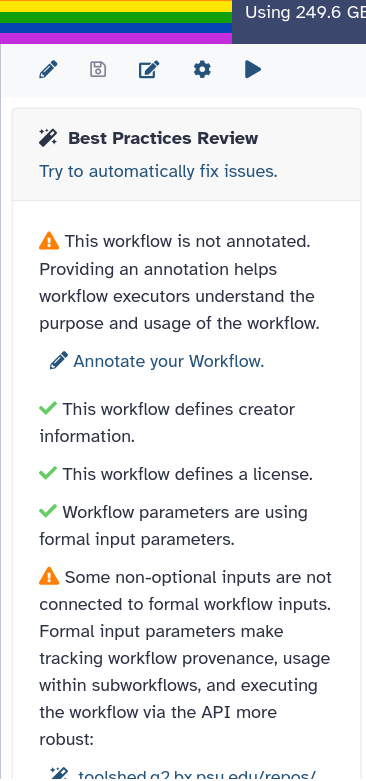
When you are editing a workflow, there are a number of additional steps you can take to ensure that it is a Best Practice workflow and will be more reusable.
Open a workflow for editing
In the workflow menu bar, you’ll find the galaxy-wf-optionsWorkflow Options dropdown menu.
Click on it and select galaxy-wf-best-practicesBest Practices from the dropdown menu.
This will take you to a new side panel, which allows you to investigate and correct any issues with your workflow.
publishing the workflow on GitHub, a public GitLab server, or another public version-controlled repository
registering the workflow with a workflow registry such as WorkflowHub or Dockstore
Automated runs of a workflow for SARS-CoV-2 lineage assignment
It’s now time to apply your newly acquired knowledge of workflow execution with Planemo to a relevant scientific problem.
Scientific background
The SARS-CoV-2 pandemic has been accompanied by unprecedented world-wide sequencing efforts. One of the accepted goals behind sequencing hundreds of thousands of individual viral isolates is to monitor the evolution and spreading of viral lineages in as close as real time as possible. Viral lineages are characterized by defining patterns of mutations that make them different from each other and from the original virus that started the pandemic at the beginning of 2020. Examples of viral lineages are B.1.1.7, first observed in the UK in the fall of 2020 and now termed variant of concern (VOC) alpha according to the WHO’s classification system, and B.1.617.2, first seen in India at the beginning of 2021 and now recognized as VOC delta.
Pangolin is a widely used tool for assigning newly sequenced viral isolates to established viral lineages, and in this final section of this tutorial you are going to run a workflow that:
takes a collection of variant datasets in the variant call format VCF,
where you can think of a collection as representing a batch of freshly sequenced viral isolates with each of its VCF datasets listing the nucleotide differences between one sample and the sequence of an original SARS-CoV-2 reference isolate
reconstructs the viral genome sequence of each sample by incorporating its variants into the reference isolate’s sequence
uses Pangolin to classify the resulting collection of genome sequences in FASTA format and to create a report of lineage assignments for all samples.
Just like in a real world situation, you will receive VCF files for several batches of samples and you will face the challenge of uploading the files from each batch as a collection into Galaxy and of triggering a run of the workflow for each of them.
Setting up the bot
Unlike for the previous toy example you will not get complete step-by-step instructions, but you are supposed to try yourself to transfer the knowledge from part 1 to this new, more complex task.
Every step along the way comes with solutions, which you can expand at any time, but you’re encouraged to give each problem some thought first.
As a very first step, however, let’s look at how the material for this part is arranged.
Hands On: Step into and explore the pangolin folder
Code In
cd ../pangolin
ls
Code Out: Folder contents
data solutions vcf2lineage.ga
The file vcf2lineage.ga defines the workflow just described, while the data/ folder holds the batches of VCF files we would, ultimately, like to run the workflow on.
Now, as a start, let’s get the workflow running on the first batch of files in the data/batch1/ subfolder.
Hands On: An initial workflow run
Create a template job file for the vcf2lineage.ga workflow.
We need to run workflow_job_init on the vcf2lineage.ga workflow.
Code In: workflow_job_init
planemo workflow_job_init vcf2lineage.ga -o vcf2lineage-job.yml
# Now let's view the contentscat vcf2lineage-job.yml
Code Out: File contents
Reference genome:class:Filepath:todo_test_data_path.extVariant calls:class:Collectioncollection_type:listelements:-class:Fileidentifier:todo_element_namepath:todo_test_data_path.extmin-AF for consensus variant:todo_param_value
The job file contains three inputs: the Reference genome, a collection of VCF files (Variant calls) and a float parameter for the minimum allele frequency (min-AF for consensus variant). Later, we will need to specify each element of the collection under elements - currently there is just a single placeholder element.
Replace the placeholder values: Reference genome should point to data/NC_045512.2_reference_sequence.fasta, Variant calls should contain all the VCF files in data/batch1, and min-AF for consensus variant should be set to 0.7.
This is the trickiest part and you should consider writing a script to solve it. The entry in the job file should look something like this at the end:
Save this as create_job_file.py and run it with python create_job_file.py vcf2lineage-job.yml data/batch1. This has the effect of updating the vcf2lineage-job.yml with all the VCF files in the data/batch1 directory.
Now that we have a complete job file, let’s run the workflow.
Code In: workflow_job_init
planemo run vcf2lineage.ga vcf2lineage-job.yml --profile planemo-tutorial --history_name"vcf2lineage test"
You should see the new invocation in the Galaxy interface.
We have now performed a test invocation of the vcf2lineage workflow. It was already more challenging than the first example; for the first time, we needed to resort to writing a script to achieve a task, in this case the construction of the job file.
The next step is to automate this process so we can run the workflow on each of the 10 batch*/ directories in the data/ folder. We can imagine that these are newly produced data released at regular intervals, which need to be analysed.
Hands On: Automating vcf2lineage execution
If we want to execute the workflow multiple times, we will once again encounter the issue that the datasets and workflow will be reuploaded each time. To avoid this, let’s obtain the dataset ID for the Reference genome (which stays the same for each invocation) and the workflow ID for the vcf2lineage.ga workflow.
Now let’s create a template job file vcf2lineage-job-template.yml which we can modify at each invocation as necessary. We can start with the output of workflow_job_init and add the Reference genome dataset ID and set min-AF for consensus variant to 0.7 again.
We need to run workflow_job_init on the vcf2lineage.ga workflow.
Code In: Original output of workflow_job_init
Reference genome:class:Filepath:todo_test_data_path.extVariant calls:class:Collectioncollection_type:listelements:-class:Fileidentifier:todo_element_namepath:todo_test_data_path.extmin-AF for consensus variant:todo_param_value
Reference genome:class:Filegalaxy_id:'1234567890abcdef'# replace with the ID you got from your own serverVariant calls:class:Collectioncollection_type:listelements:-class:Fileidentifier:todo_element_namepath:todo_test_data_path.extmin-AF for consensus variant:0.7
We can copy and modify this new vcf2lineage-job-template.yml file iteratively to invoke the workflow on each of the data batches.
Write a shell script to iterate over all the batches, create a job file and invoke with planemo run. After execution, move the processed batch to data/complete.
Once again, there is no single exact solution. Here is one possibility:
for batch in`ls-d data/batch*`;do
batch_name=`basename$batch`cp vcf2lineage-job-template.yml vcf2lineage-${batch_name}-job.yml
python create_job_file.py vcf2lineage-${batch_name}-job.yml $batch# replace with your own workflow ID below
planemo run f4b02af7e642e75b vcf2lineage-${batch_name}-job.yml --profile planemo-tutorial
sleep 300
mv$batch data/complete/
done
Save this as run_vcf2lineage.sh.
Run your script. Do you notice any issues? What could be improved?
Uploads can cause several issues:
The default planemo behavior is to upload datasets one at a time, which ensures the server cannot be overloaded, but is slow. To upload all datasets simultaneously, you could use the --simultaneous_uploads flag.
If one of the upload jobs fails, the workflow will by default not be invoked - Planemo will just upload the datasets and finish. To override this behavior and start a workflow even if one or more uploads fail, you can use the --no_check_uploads_ok flag.
For a more complex solution to the issue of failed uploads, see this script from the ena-cog-uk-wfs repo.
More advanced solutions
This was a very basic example of a workflow. Perhaps for your case, you need a more customized solution.
For example, it might be the case that you want to run multiple different workflows, one after another. In this case you would need to implement some sort of check to verify if one invocation had finished, before beginning with the next one. Planemo will probably not be enough for a task like this; you will need to resort to using the lower-level BioBlend library to interact directly with the Galaxy API.
The Galaxy SARS-CoV-2 genome surveillance bot provides an example of a more advanced customized workflow execution solution, combining Planemo commands, custom BioBlend scripts and bash scripts, which then get run automatically via continuous integration (CI) on a Jenkins server.
Conclusion
You should now have a better idea about how to run Galaxy workflows from the command line and how to apply the ideas you have learnt to your own project.
You've Finished the Tutorial
Please also consider filling out the Feedback Form as well!
Key points
Workflows can be executed not only through the web browser, but also via the command line.
Executing workflows programmatically allows automation of analyses.
Frequently Asked Questions
Have questions about this tutorial? Have a look at the available FAQ pages and support channels
Did you use this material as an instructor? Feel free to give us feedback on how it went.
Did you use this material as a learner or student? Click the form below to leave feedback.
Hiltemann, Saskia, Rasche, Helena et al., 2023 Galaxy Training: A Powerful Framework for Teaching! PLOS Computational Biology 10.1371/journal.pcbi.1010752
Batut et al., 2018 Community-Driven Data Analysis Training for Biology Cell Systems 10.1016/j.cels.2018.05.012
@misc{galaxy-interface-workflow-automation,
author = "Simon Bray and Wolfgang Maier and Gildas Le Corguillé",
	title = "Automating Galaxy workflows using the command line (Galaxy Training Materials)",
	year = "",
	month = "",
	day = "",
	url = "\url{https://training.galaxyproject.org/training-material/topics/galaxy-interface/tutorials/workflow-automation/tutorial.html}",
	note = "[Online; accessed TODAY]"
}
@article{Hiltemann_2023,
	doi = {10.1371/journal.pcbi.1010752},
	url = {https://doi.org/10.1371%2Fjournal.pcbi.1010752},
	year = 2023,
	month = {jan},
	publisher = {Public Library of Science ({PLoS})},
	volume = {19},
	number = {1},
	pages = {e1010752},
	author = {Saskia Hiltemann and Helena Rasche and Simon Gladman and Hans-Rudolf Hotz and Delphine Larivi{\`{e}}re and Daniel Blankenberg and Pratik D. Jagtap and Thomas Wollmann and Anthony Bretaudeau and Nadia Gou{\'{e}} and Timothy J. Griffin and Coline Royaux and Yvan Le Bras and Subina Mehta and Anna Syme and Frederik Coppens and Bert Droesbeke and Nicola Soranzo and Wendi Bacon and Fotis Psomopoulos and Crist{\'{o}}bal Gallardo-Alba and John Davis and Melanie Christine Föll and Matthias Fahrner and Maria A. Doyle and Beatriz Serrano-Solano and Anne Claire Fouilloux and Peter van Heusden and Wolfgang Maier and Dave Clements and Florian Heyl and Björn Grüning and B{\'{e}}r{\'{e}}nice Batut and},
	editor = {Francis Ouellette},
	title = {Galaxy Training: A powerful framework for teaching!},
	journal = {PLoS Comput Biol}
}
Funding
These individuals or organisations provided funding support for the development of this resource
Questions:
Open image in new tab
Open image in new tab