This tutorial will take you from the multiple AnnData outputs of the previous tutorial to a single, combined AnnData object, ready for all the fun downstream processing. We will also look at how to add in metadata (for instance, SEX or GENOTYPE) for analysis later on.
You are in one of the four tutorials associated with a Case Study, which replicates and expands on the analysis performed in a manuscript Bacon et al. 2018.
Figure 1: Overview of the four parts of the case study, represented by boxes connected with noodles. There is a signpost specifying that you are currently in the second part.
We are particularly keen for learners to be able to go from raw FASTQ files all the way through analysis. We aren’t handing you a curated dataset that we specially modified in order for this tutorial to work.
The only difference is that in that previous tutorial, we only analysed one dataset. Our input data, however, is the result of applying that workflow to all seven datasets.
This is a 'Choose Your Own Tutorial' (CYOT) section (also known as 'Choose Your Own Analysis' (CYOA)), where you can select between multiple paths. Click one of the buttons below to select how you want to follow the tutorial
If you’re on the EU or ORG/USA server, then the quickest way to Get the Data for this tutorial is via importing a history. Otherwise, you can also import from Zenodo - it just might take a moment longer if you’re in a live course and everyone is importing the same dataset at the same time!
Hands On: Import History
Import the galaxy-history-inputInput history by following the link below
Click on the Import this history button on the top left
Enter a title for the new history
Click on Copy History
If you want to import the history to another Galaxy server, check how to do it below!
Transfer a Single Dataset
At the sender Galaxy server, set the history to a shared state, then directly capture the galaxy-link link for a dataset and paste the URL into the Upload tool at the receiver Galaxy server.
Transfer an Entire History
Have an account at two different Galaxy servers, and be logged into both.
Click into the History Options menu in the history panel.
Select from the menu galaxy-history-archiveExport History to File.
Choose the option for How do you want to export this History? as to direct download.
Click on Generate direct download.
Allow the archive generation process to complete. *
Copy the galaxy-link link for your new archive.
At the receiver Galaxy server
Confirm that you are logged into your account.
Click on Data in the top menu, and choose Histories to reach your Saved Histories.
Click on Import history in the grey button on the top right.
Paste in your link’s URL from step 7.
Click on Import History.
Allow the archive import process to complete. *
The transfered history will be uncompressed and added to your Saved Histories.
* For steps 6 and 13: It is Ok to navigate away for other tasks during processing. If enabled, Galaxy will send you status notifications.
tip If the history to transfer is large, you may copy just your important datasets into a new history, and create the archive from that new smaller history. Clearing away deleted and purged datasets will make all histories smaller and faster to archive and transfer!
Hands On: Data upload for 7 files
Create a new history for this tutorial (if you’re not importing the history above)
Import the different AnnData files and the experimental design table from Zenodo.
Click galaxy-uploadUpload at the top of the activity panel
Select galaxy-wf-editPaste/Fetch Data
Paste the link(s) into the text field
Press Start
Close the window
Rename the datasets
Check that the AnnData files datatype is h5ad, otherwise you will need to change each file to h5ad!
Click on the galaxy-pencilpencil icon for the dataset to edit its attributes
In the central panel, click galaxy-chart-select-dataDatatypes tab on the top
In the galaxy-chart-select-dataAssign Datatype, select datatypes from “New Type” dropdown
Tip: you can start typing the datatype into the field to filter the dropdown menu
Click the Save button
galaxy-eye Inspect the param-fileExperimental Design text file. This shows you how each N70X corresponds to a sample, and whether that sample was from a male or female. This will be important metadata to add to our sample, which we will add very similarly to how you added the gene_name and mito metadata previously!
Important tips for easier analysis
Tools are frequently updated to new versions. Your Galaxy may have multiple versions of the same tool available. By default, you will be shown the latest version of the tool. This may NOT be the same tool used in the tutorial you are accessing. Furthermore, if you use a newer tool in one step, and try using an older tool in the next step… this may fail! To ensure you use the same tool versions of a given tutorial, use the Tutorial mode feature.
Open your Galaxy server
Click on the curriculum icon on the top menu, this will open the GTN inside Galaxy.
Navigate to your tutorial
Tool names in tutorials will be blue buttons that open the correct tool for you
Note: this does not work for all tutorials (yet)
You can click anywhere in the grey-ed out area outside of the tutorial box to return back to the Galaxy analytical interface
Warning: Not all browsers work!
We’ve had some issues with Tutorial mode on Safari for Mac users.
Try a different browser if you aren’t seeing the button.
Did you know we have a unique Single Cell Omics Lab with all our single cell tools highlighted to make it easier to use on Galaxy? We recommend this site for all your single cell analysis needs, particularly for newer users.
The Single Cell Omics Lab is a different view of the underlying Galaxy server that organises tools and resources better for single-cell users! It also provides a platform for communities to engage and connect; distribute more targeted news and events; and highlight community-specific funding sources.
When something goes wrong in Galaxy, there are a number of things you can do to find out what it was. Error messages can help you figure out whether it was a problem with one of the settings of the tool, or with the input data, or maybe there is a bug in the tool itself and the problem should be reported. Below are the steps you can follow to troubleshoot your Galaxy errors.
Expand the red history dataset by clicking on it.
Sometimes you can already see an error message here
View the error message by clicking on the bug icongalaxy-bug
Check the logs. Output (stdout) and error logs (stderr) of the tool are available:
Expand the history item
Click on the details icon
Scroll down to the Job Information section to view the 2 logs:
If you get stuck, you can first check your history against an galaxy-history-answer Answer Key history found in the header of (some) tutorials.
First, import the target history.
Open the link to the shared history
Click on the Import this history button on the top left
Enter a title for the new history
Click on Copy History
Next, compare the answer key history with your own history.
You can view multiple Galaxy histories at once. This allows to better understand your analyses and also makes it possible to drag datasets between histories. This is called “History multiview”. The multiview can be enabled either view History menu or via the Activity Bar:
Option 1: Enabling Multiview via History menu is done by first clicking on the galaxy-history-options “History options” drop-down and selecting galaxy-multihistory “Show Histories Side-by-Side option”:
Option 2: Clicking the galaxy-multihistory “History Multiview” button within the Activity Bar:
You can compare there, or if you’re really stuck, you can also click and drag a given dataset to your history to continue the tutorial from there.
There 3 ways to copy datasets between histories
From the original history
Click on the galaxy-gear icon which is on the top of the list of datasets in the history panel
Click on Copy Datasets
Select the desired files
Give a relevant name to the “New history”
Validate by ‘Copy History Items’
Click on the new history name in the green box that have just appear to switch to this history
Using the galaxy-columnsShow Histories Side-by-Side
Click on the galaxy-dropdown dropdown arrow top right of the history panel (History options)
Click on galaxy-columnsShow Histories Side-by-Side
If your target history is not present
Click on ‘Select histories’
Click on your target history
Validate by ‘Change Selected’
Drag the dataset to copy from its original history
Drop it in the target history
From the target history
Click on User in the top bar
Click on Datasets
Search for the dataset to copy
Click on its name
Click on Copy to current History
You can also use our handy troubleshooting guide.
When something goes wrong in Galaxy, there are a number of things you can do to find out what it was. Error messages can help you figure out whether it was a problem with one of the settings of the tool, or with the input data, or maybe there is a bug in the tool itself and the problem should be reported. Below are the steps you can follow to troubleshoot your Galaxy errors.
Expand the red history dataset by clicking on it.
Sometimes you can already see an error message here
View the error message by clicking on the bug icongalaxy-bug
Check the logs. Output (stdout) and error logs (stderr) of the tool are available:
Expand the history item
Click on the details icon
Scroll down to the Job Information section to view the 2 logs:
Manipulate AnnData ( Galaxy version 0.10.9+galaxy1) with the following parameters:
param-file“Annotated data matrix”: N701-400k
“Function to manipulate the object”: Concatenate along the observations axis
param-file“Annotated data matrix to add”: Select all the other matrix files from bottom to top, N702 to N707
Comment
If you imported files from Zenodo instead of using the input history, yours might not be in the same order as ours. Since the files will be concatenated in the order that you click, it will be helpful if you click them in the same order, from N702 to N707. This will ensure your samples are given the same batch numbers as we got in this tutorial, which will help when we’re adding in metadata later!
Warning: Don't add N701!
You are adding files to N701, so do not add N701 to itself!
“Join method”: Intersection of variables
“Key to add the batch annotation to obs”: batch
“Separator to join the existing index names with the batch category”: -
Rename galaxy-pencil output Combined_Object
Now let’s look at what we’ve done! You can peek at the AnnData object in your galaxy-history history. You can also inspect the dataset for further details using a tool.
Hands On: Inspecting AnnData Objects
Inspect AnnData ( Galaxy version 0.10.9+galaxy1) with the following parameters:
param-file“Annotated data matrix”: Combined_object
“What to inspect?”: General information about the object
Inspect AnnData ( Galaxy version 0.10.9+galaxy1) with the following parameters:
param-file“Annotated data matrix”: Combined_object
“What to inspect?”: Key-indexed observations annotation (obs)
Inspect AnnData ( Galaxy version 0.10.9+galaxy1) with the following parameters:
param-file“Annotated data matrix”: Combined_object
“What to inspect?”: Key-indexed annotation of variables/features (var)
Now have a look at the three toolInspect AnnData outputs.
Question
How many cells do you have now?
Where is batch information stored?
If you peek at your dataset, or look at the General informationtool output, you will find there are 316 cells, as the matrix is now 316 cells (n_obs) x 35734 genes (n_var). You will also find these numbers in the obstool (cells) and vartool (genes) file sizes.
Batch information is stored under Key-indexed observations annotation (obs). Different versions of the Manipulate tool might put the batch columns in different locations. The tool version in this tutorial puts batch in the 8th column. Batch refers to the order in which the matrices were added. The files are added from the bottom of the history upwards, so be careful how you set up your histories when running this (i.e. if your first dataset is N703 and the second is N701, the batch will call N703 0 and N701 1!)
Adding cell metadata
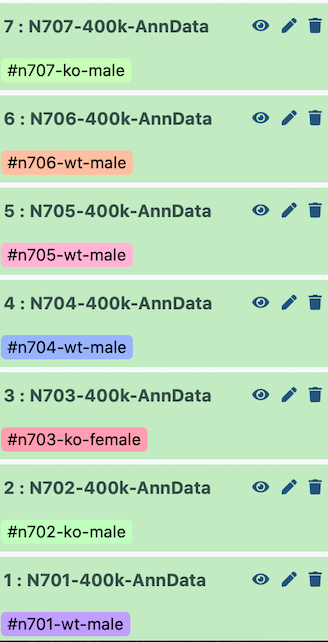
I set up the example history with the earliest indices at the bottom.
Figure 2: Correct history ordering for combining datasets in order
{ width=400px }
Therefore, when it is all concatenated together, the batch appears as follows:
Index
Batch
Genotype
Sex
N701
0
wildtype
male
N702
1
knockout
male
N703
2
knockout
female
N704
3
wildtype
male
N705
4
wildtype
male
N706
5
wildtype
male
N707
6
knockout
male
If you used Zenodo to import files, they may not have imported in order (i.e. N701 to N707, ascending). In that case, you will need to tweak the parameters of the next tools appropriately to label your batches correctly!
The two critical pieces of metadata in this experiment are sex and genotype. I will later want to color my cell plots by these parameters, so I want to add them in now!
Sex & Genotype metadata
Hands On: Labelling sex
Replace Text ( Galaxy version 9.5+galaxy0) with the following parameters:
param-file“File to process”: output of Inspect AnnData: Key-indexed observations annotation (obs)tool)
“1. Replacement”
“in column”: Column: 8 - or whichever column batch is in
“Find pattern”: 0|1|3|4|5|6
“Replace with”: male
+ Insert Replacement
“2. Replacement”
“in column”: Column: 8
“Find pattern”: 2
“Replace with”: female
+ Insert Replacement
“3. Replacement”
“in column”: Column: 8
“Find pattern”: batch
“Replace with”: sex
The output of the param-fileReplace Texttool tool has many columns. However, we want only the column containing the sex information, in order by cell barcode, to add to our AnnData later.
Cut columns from a table with the following parameters:
“Cut columns”: c8
“Delimited by”: Tab
param-file“From”: output of Replace texttool
Rename galaxy-pencil output Sex_metadata
That was so fun, let’s do it all again but for genotype!
Hands On: Labelling genotype
Replace Text in a specific column ( Galaxy version 9.5+galaxy0) with the following parameters:
param-file“File to process”: output of Inspect AnnData: Key-indexed observations annotation (obs)tool
“1. Replacement”
“in column”: Column: 8
“Find pattern”: 0|3|4|5
“Replace with”: wildtype
+ Insert Replacement
“2. Replacement”
“in column”: Column: 8
“Find pattern”: 1|2|6
“Replace with”: knockout
+ Insert Replacement
“3. Replacement”
“in column”: Column: 8
“Find pattern”: batch
“Replace with”: genotype
Now we want only the column containing the genotype information - we will ultimately add this into the cell annotation in the AnnData object.
Cut columns from a table with the following parameters:
“Cut columns”: c8
“Delimited by”: Tab
param-file“From”: output of Replace texttool
Rename galaxy-pencil output Genotype_metadata
You might want to do this with all sorts of different metadata - which labs handled the samples, which days they were run, etc. Once you’ve created and cut all your metadata columns, we can paste them together before adding them into the AnnData object itself.
Hands On: Combining metadata columns
Paste two files side by side with the following parameters:
param-file“Paste”: Genotype_metadata
param-file“and”: Sex_metadata
“Delimit by”: Tab
Rename galaxy-pencil output Cell_Metadata
Let’s add this metadata to the AnnData object!
Hands On: Adding metadata to AnnData object
Manipulate AnnData ( Galaxy version 0.10.9+galaxy1) with the following parameters:
param-file“Annotated data matrix”: Combined_object
“Function to manipulate the object”: Add new annotation(s) for observations or variables
“What to annotate?”: Observations (obs)`
param-file“Table with new annotations”: Cell_Metadata
Woohoo! We’re there! You can peek at your new AnnData object in your history galaxy-history to see the additional Obs categories to make sure this worked. You should now find a sex and genotype in the Obs listing.
Add batch metadata
I want to clean up this AnnData object just a bit more first. It would be a lot nicer if ‘batch’ meant something, rather than ‘the order in which the Manipulate AnnData tool added my datasets’.
Hands On: Labelling batches
Manipulate AnnData ( Galaxy version 0.10.9+galaxy1) with the following parameters:
param-file“Annotated data matrix”: output of Manipulate AnnData - Add new annotationstool
“Function to manipulate the object”: Rename categories of annotation
“Key for observations or variables annotation”: batch
“Comma-separated list of new categories”: N701,N702,N703,N704,N705,N706,N707
Rename galaxy-pencil output Batched_Object
congratulations Well done! Peek at your final param-fileBatched_Object to see the wealth of information that has been added. You are now ready to move along to further filtering!
Conclusion
You might find the galaxy-history-answerAnswer Key Histories helpful to check or compare with:
Finally, you may remember that the datasets you analysed in this tutorial were downsampled. The idential analysis can be performed on whole samples, which you can find in the example histories below.
warning Remember that if you are in a course, time for exploring these histories will not be factored into the schedule. Explore these outside of course time!
We also post new tutorials / workflows there from time to time, as well as any other news.
point-right If you’d like to contribute ideas, requests or feedback as part of the wider community building single-cell and spatial resources within Galaxy, you can also join our Single cell & sPatial Omics Community of Practice.
Further information, including links to documentation and original publications, regarding the tools, analysis techniques and the interpretation of results described in this tutorial can be found here.
References
Bacon, W. A., R. S. Hamilton, Z. Yu, J. Kieckbusch, D. Hawkes et al., 2018 Single-Cell Analysis Identifies Thymic Maturation Delay in Growth-Restricted Neonatal Mice. Frontiers in Immunology 9: 10.3389/fimmu.2018.02523
Feedback
Did you use this material as an instructor? Feel free to give us feedback on how it went.
Did you use this material as a learner or student? Click the form below to leave feedback.
Hiltemann, Saskia, Rasche, Helena et al., 2023 Galaxy Training: A Powerful Framework for Teaching! PLOS Computational Biology 10.1371/journal.pcbi.1010752
Batut et al., 2018 Community-Driven Data Analysis Training for Biology Cell Systems 10.1016/j.cels.2018.05.012
@misc{single-cell-scrna-case_alevin-combine-datasets,
author = "Wendi Bacon",
	title = "Combining single cell datasets after pre-processing (Galaxy Training Materials)",
	year = "",
	month = "",
	day = "",
	url = "\url{https://training.galaxyproject.org/training-material/topics/single-cell/tutorials/scrna-case_alevin-combine-datasets/tutorial.html}",
	note = "[Online; accessed TODAY]"
}
@article{Hiltemann_2023,
	doi = {10.1371/journal.pcbi.1010752},
	url = {https://doi.org/10.1371%2Fjournal.pcbi.1010752},
	year = 2023,
	month = {jan},
	publisher = {Public Library of Science ({PLoS})},
	volume = {19},
	number = {1},
	pages = {e1010752},
	author = {Saskia Hiltemann and Helena Rasche and Simon Gladman and Hans-Rudolf Hotz and Delphine Larivi{\`{e}}re and Daniel Blankenberg and Pratik D. Jagtap and Thomas Wollmann and Anthony Bretaudeau and Nadia Gou{\'{e}} and Timothy J. Griffin and Coline Royaux and Yvan Le Bras and Subina Mehta and Anna Syme and Frederik Coppens and Bert Droesbeke and Nicola Soranzo and Wendi Bacon and Fotis Psomopoulos and Crist{\'{o}}bal Gallardo-Alba and John Davis and Melanie Christine Föll and Matthias Fahrner and Maria A. Doyle and Beatriz Serrano-Solano and Anne Claire Fouilloux and Peter van Heusden and Wolfgang Maier and Dave Clements and Florian Heyl and Björn Grüning and B{\'{e}}r{\'{e}}nice Batut and},
	editor = {Francis Ouellette},
	title = {Galaxy Training: A powerful framework for teaching!},
	journal = {PLoS Comput Biol}
}
Congratulations on successfully completing this tutorial!
Do you want to extend your knowledge?
Follow one of our recommended follow-up trainings:
Questions:
Open image in new tab


 Open image in new tab